









This guide takes you from download to your first wireless photo in about ten minutes, then covers every feature of Lensflow Pro. If something does not work, jump to Troubleshooting. For a quick look at every screen, see the Lensflow Pro overview.
Before you start
- Mac: Apple silicon (M1 or newer) with macOS 12.3 or later.
- Camera: a Canon EOS camera with Wi-Fi and a Remote control (EOS Utility) option. Tested on the EOS 200D II.
- Wi-Fi: the camera and the Mac on the same network. Most cameras need a 2.4 GHz network. Office or guest networks that block devices from seeing each other will not work.
- Python 3: free. Lensflow Pro uses it to talk to the camera.
Step 1: Install Lensflow Pro
- After you buy, download Lensflow Pro-5.0.dmg from your order email or your account page.
- Double-click the DMG and drag Lensflow Pro onto Applications.
- Open Lensflow Pro from Applications. macOS says it cannot check the app, because Lensflow Pro is not yet signed by Apple. Click Done.
- Open System Settings, Privacy & Security. Scroll down to the message about Lensflow Pro and click Open Anyway, then confirm with your password or Touch ID.
- When macOS asks if Lensflow Pro can find devices on your local network, click Allow. Without this it cannot see the camera.
Install Python 3 (if Lensflow Pro asks)
Download the macOS installer from python.org, run it, then open Lensflow Pro again. Lensflow Pro finds it by itself.
Step 2: Pair the camera once
Your camera must trust your Mac before any app can control it. Canon’s free EOS Utility does this pairing, and pairing still works on the newest macOS.
- Install EOS Utility from Canon’s support site for your camera model.
- On the camera: Menu, Wireless settings, Wi-Fi function, Remote control (EOS Utility), then Add a device to connect. Join your Wi-Fi network.
- On the Mac, open EOS Utility and click Pairing over Wi-Fi/LAN. Select your camera and click Connect, then confirm on the camera.
- When the camera shows Connected, pairing is done. Quit EOS Utility. You do not need it again.
Step 3: Connect every day
- Open Lensflow Pro on the Mac.
- On the camera: Menu, Wireless settings, Wi-Fi function, Remote control (EOS Utility), then pick your Mac.
- In a few seconds the pill at the top of Lensflow Pro turns green and says Connected, and the live picture appears.
Lensflow Pro closes EOS Utility automatically if it is open, because the camera accepts only one computer app at a time.
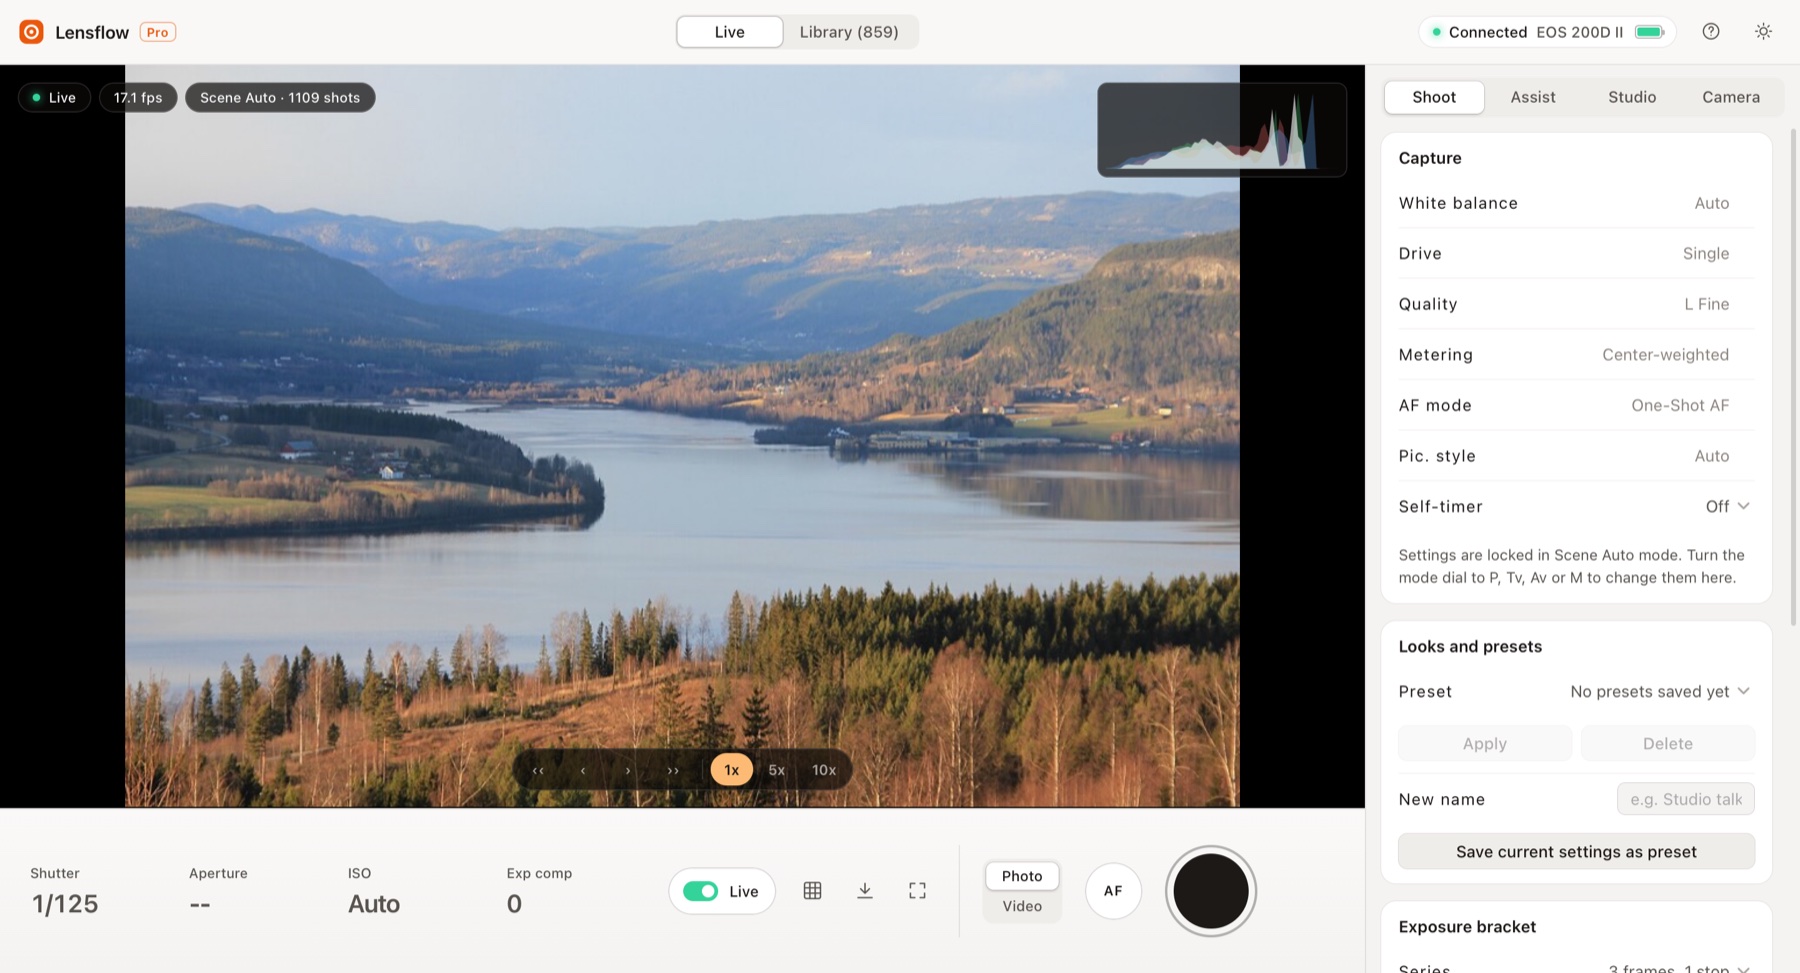
Take photos
- Set the camera’s power switch to ON.
- Choose Photo next to the big button, then click the white button or press Space.
- The screen flashes and the new photo appears next to the button once it is saved on the card and copied to your Mac.
- Click the picture to focus on that spot. AF focuses the normal way. In P, Tv, Av and M modes you can also step focus with the arrows under the picture.
- If the camera cannot focus, Lensflow Pro tries once more without autofocus and tells you what happened.
Record videos
- Push the camera’s power switch past ON to the movie icon. This drops the Wi-Fi link, so start Remote control on the camera again.
- Lensflow Pro shows Movie mode at the top of the picture, and the picture becomes wide (16:9).
- Choose Video, then press the red button to start and again to stop. A REC timer shows while you record.
- When you stop, the clip copies to your Mac.
Sound for videos
Open the Studio tab, Sound for videos.
- Camera mic (default): the camera records its own sound in every clip. A microphone plugged into the camera counts as the camera mic.
- Mac mic: Lensflow Pro also records your Mac’s microphone, or any microphone plugged into the Mac. Pick it from the list. It starts the Mac microphone first, then the camera, and saves a copy of each clip named _mac_audio.mp4 with that sound lined up. The original clip keeps the camera sound.
The first time, macOS asks if Lensflow Pro can use the microphone. Click Allow. Mac mic needs ffmpeg, see Optional extras.
Change camera settings
Shutter, aperture, ISO and exposure compensation sit under the picture. Click a value to change it. White balance, drive, quality, metering, AF mode and picture style are in the Shoot tab. These unlock when the camera’s mode dial is on P, Tv, Av or M. In Scene Auto the camera chooses for you.
The Shoot tab also has the self-timer, exposure brackets, an interval timer, a bulb timer (dial on M, shutter set to Bulb) and presets that save your favourite settings.
Get files onto your Mac
- New photos and clips copy to your Mac by themselves, into dated folders.
- Open Library at the top to see the whole card. Click to select one file, use Select day for a date, or Select all.
- Click Download selected or Download everything new. A progress bar shows each file.
- Double-click any file for a full preview. Select two photos and click Compare 2 to see them side by side.
- Delete from card warns you if a file is not on your Mac yet.
In the Camera tab you can change the save folder, start a named shoot session (files go into their own folder) and turn on an automatic backup copy to another drive or iCloud Drive.
Studio features
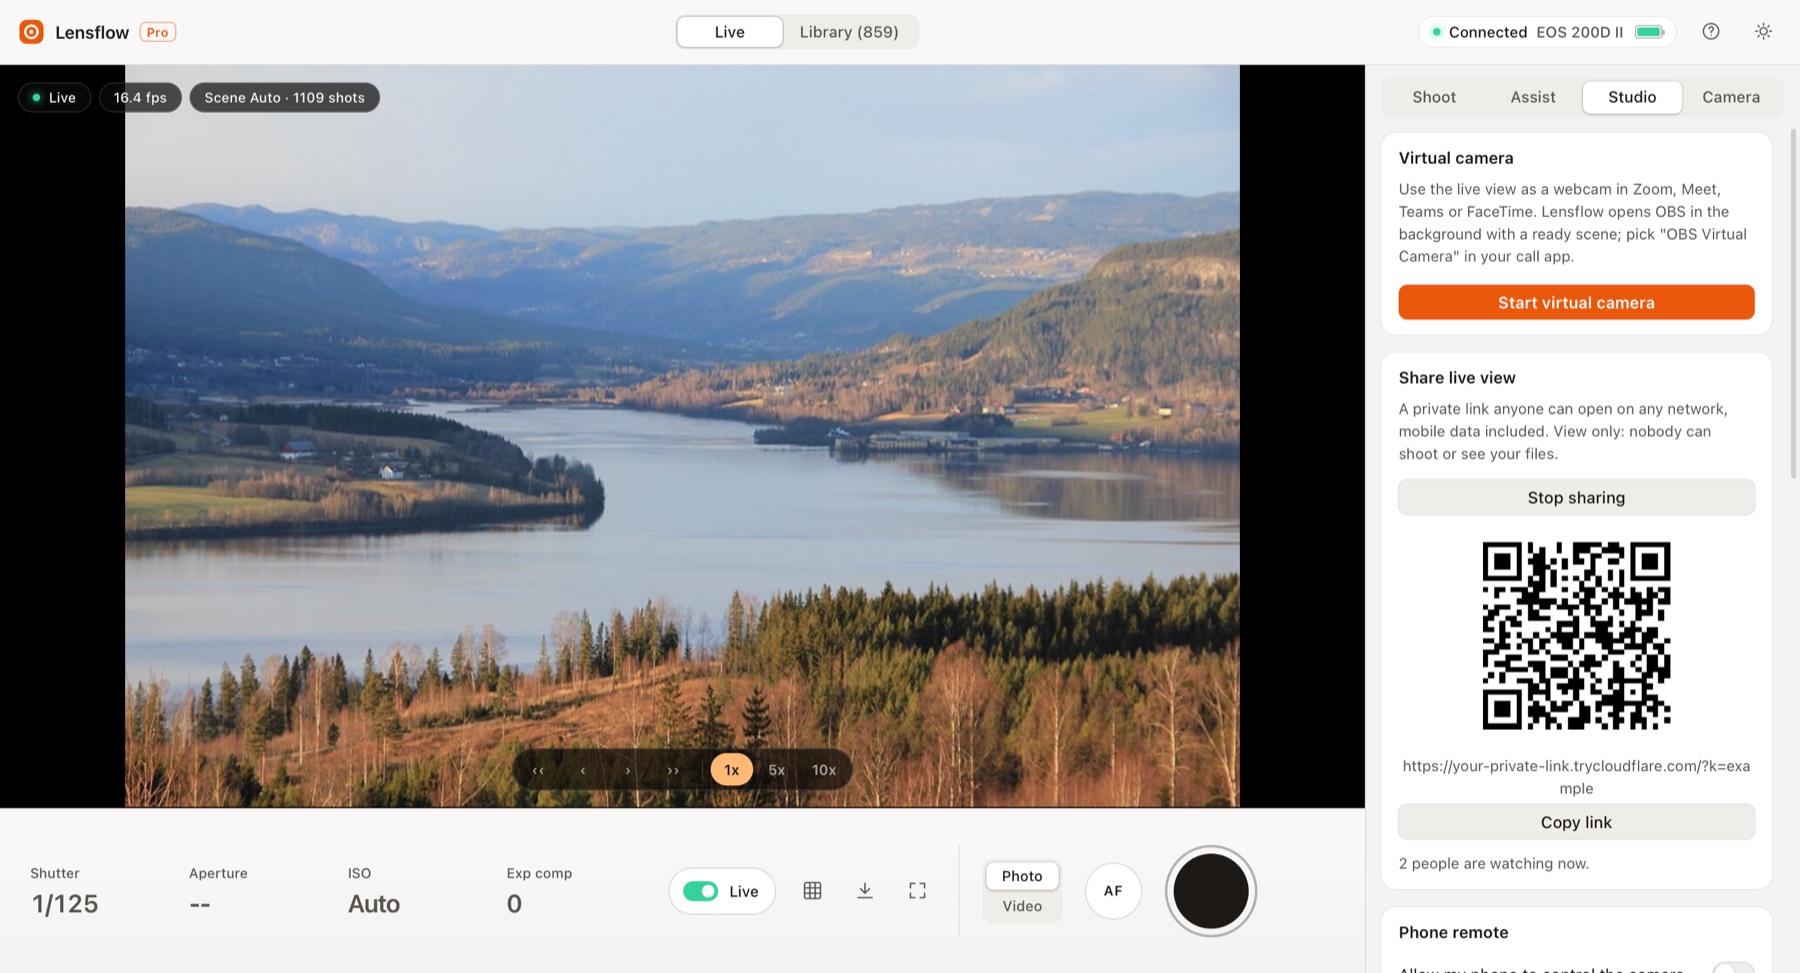
Webcam for video calls
Install free OBS Studio, then click Start virtual camera. Lensflow Pro opens OBS in the background with a ready scene. In Zoom, Meet, Teams or FaceTime choose OBS Virtual Camera. After installing OBS the first time, restart the Mac once so the camera appears in other apps.
Live link: watch from anywhere
Click Create live link. You get a private link and a QR code that open on any phone or computer, on any network. It is view only: nobody can shoot, change settings or see your files. Keep the Mac on and Lensflow Pro open; the Mac stays awake while the link is live. Click Stop sharing and the link stops working. Treat the link like a password. Needs cloudflared, see Optional extras.
Phone remote on the same Wi-Fi
Switch on Allow my phone to control the camera and scan the code. Your phone shows the live view with a shutter and an AF button. It only works on the same Wi-Fi and only while the switch is on.
Teleprompter, vertical copies and captions
- Teleprompter: paste your script and press Start. It scrolls over the live view. Set the speed and text size.
- Vertical 9:16 copy: switch on Also save a vertical 9:16 copy. Each downloaded video gets a 1080 x 1920 copy in a Vertical 9×16 folder.
- Captions: open a downloaded video in Library and click Make captions. You get an SRT file and an MP4 with subtitles you can switch on. English only for now.
Assist tools
The Assist tab has a histogram, zebras for blown highlights, focus peaking, mirror view, composition guides (thirds, golden ratio, center cross, diagonals) and crop guides for 1:1, 4:5, 16:9, 9:16 and 2.39:1. The Camera tab shows your lens and body, and sets the camera clock to your Mac’s time.
Optional extras (free)
These free tools unlock extra features. The easiest way to install them is Homebrew. Open Terminal and run the line you need:
| Feature | Tool | Terminal command |
|---|---|---|
| Mac mic sound, vertical copies | ffmpeg | brew install ffmpeg |
| Live link to any phone | cloudflared | brew install cloudflared |
| Webcam for calls | OBS Studio | brew install --cask obs |
| Captions | whisper.cpp | brew install whisper-cpp |
Captions also need the English speech model. Run this once in Terminal:
mkdir -p ~/Library/Application\ Support/Lensflow Pro && curl -L -o ~/Library/Application\ Support/Lensflow Pro/ggml-base.en.bin https://huggingface.co/ggerganov/whisper.cpp/resolve/main/ggml-base.en.binTroubleshooting
Lensflow Pro keeps saying “Scanning”
Start Remote control (EOS Utility) on the camera again and pick your Mac. Check that the camera and the Mac are on the same Wi-Fi, and that Lensflow Pro is allowed in System Settings, Privacy & Security, Local Network.
The camera shows Err 11
The camera could not find a paired computer. Make sure you finished Step 2 on this Mac, then try again.
A photo did not save
The camera could not focus. Aim at something with detail and good light, check the lens cap, and set the lens switch to AF. Also check the card has space and the power switch is on ON, not the movie position.
Video will not start
The power switch must be on the movie icon. After moving it, start Remote control on the camera again.
The Mac mic recording is silent
Open System Settings, Privacy & Security, Microphone and switch Lensflow Pro on.
Settings are greyed out
Turn the mode dial to P, Tv, Av or M. In Scene Auto the camera does not let other apps change these.
“OBS Virtual Camera” is not in my call app
Restart the Mac once after installing OBS, then quit and reopen the call app.
Uninstall
Drag Lensflow Pro from Applications to the Bin. Your photos and videos stay in your save folder. Settings live in ~/Library/Application Support/CanonLive and can be deleted too.
Need help?
Email contact@digitalpritam.in with your camera model, your Mac model and macOS version, and what you see on screen. Read why I built Lensflow Pro, or get Lensflow Pro.
Canon and EOS are trademarks of Canon Inc. Lensflow Pro is an independent product by Digital Pritam and is not made, endorsed or supported by Canon.