







Disclosure: some links on this page are affiliate links. If you buy through them we may earn a commission, at no extra cost to you.
To start a blog, pick a topic, get a domain and hosting, install WordPress, choose a theme, and publish your first post. You can do the setup in an afternoon. This guide walks through all 12 steps with real screenshots, plain words and prices in rupees.
I took the WordPress screenshots on a throwaway test blog on my own computer, called Pune Home Garden, and the hosting screenshots from Hostinger‘s public pages. I read every price on 15 Nov 2026. I mark what I tested and what I only read.
Tested on a local test site: every WordPress screen in steps 4 to 11 (WordPress 7.1.4) and SmartUsername 1.5.0. Only read, not tested: Hostinger's checkout, its one-click installer and its dashboard. We make no promise about readers or earnings.
15 Nov 2026: rebuilt with real screenshots, a security step on login usernames, and every price re-read on Hostinger's page.
The 12 steps at a glance
- 1Pick a topic
Choose a subject you can write about for a year.
- 2Choose a name and domain
Your web address, short and easy to say.
- 3Buy hosting
The computer that keeps your blog online.
- 4Install WordPress
One click on most hosts.
- 5Set the basics
Site title, tagline and clean links.
- 6Pick a theme
Start with a free one.
- 7Publish your first post
In the block editor.
- 8Add the essential pages
About, Contact and Privacy Policy.
- 9Set up basic SEO
Help people find your posts on Google.
- 10Keep it updated and healthy
Updates, backups and Site Health.
- 11Change your login username
Do not leave it as admin.
- 12Tell people about it
Share, link and stay steady.
On this page17 sections
Step 1: Pick a topic
Your topic, also called a niche, is what your blog is about. A clear topic tells readers what to expect and helps Google understand your site. The demo blog in this guide is about growing food on a balcony in Pune.
Write three lists. What do you know well? What do you enjoy? What do people ask you about? Your topic sits where the lists meet. Then check it with the table below.
| Question | Why it matters | A good sign |
|---|---|---|
| Can I write 50 posts on this? | A blog needs a steady flow of ideas | You list 20 post ideas in ten minutes |
| Do I enjoy it? | You will write about it for a long time | You read about it even when you do not have to |
| Do people search for it? | Search brings free readers over time | A keyword tool shows searches for your ideas |
| Can I add my own view? | Google asks for helpful, original content | You have real experience to share |
| Is there a way to earn from it? | Only if earning is one of your goals | Brands, products or services fit the topic |
Write one sentence: "This blog helps [who] do [what]." Keep it in view. Our guide on how to do keyword research shows how to check demand with free tools.
A 5-minute topic test
- Type your topic into Google and read the suggestions that appear in the search box. They show what people ask.
- List 20 post ideas. If you stall at 10, the topic may be too narrow or not yours.
- Search each idea once. If the first page shows only huge sites, pick a narrower angle.
- Say the topic to a friend. If they ask a follow-up question, that question is a post.
If you use an AI chat tool for ideas, treat the answers as a rough start and check them yourself. Three prompts you can paste:
- “List 20 questions a beginner in [topic] in India asks.”
- “Give me 10 short blog name ideas for [topic], easy to spell.”
- “Write a simple outline for a post that answers [question] in five steps.”
Avoid topics that are too wide, like “life” or “technology”. “Home gardening in Pune” is easier to write and easier to rank. We have not run a demand check for the demo topic, since it is only an example.
Step 2: Choose a name and a domain
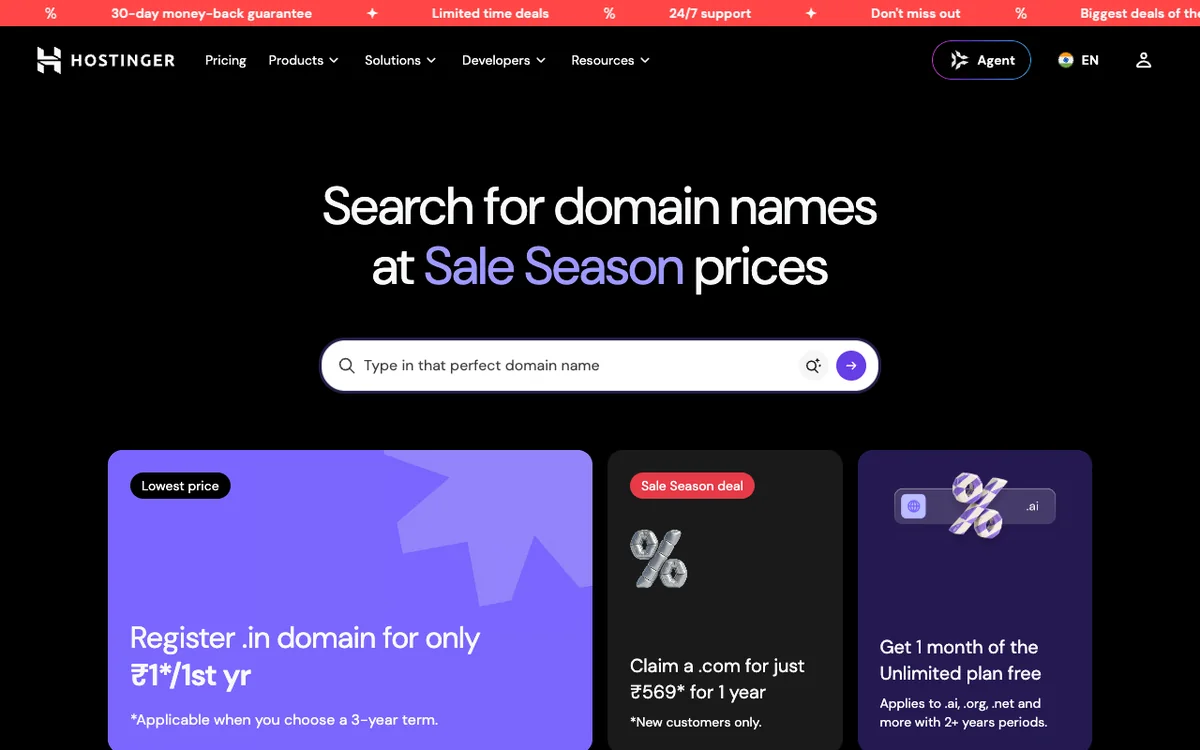
A domain name is your web address, like digitalpritam.in. Hostinger’s FAQ gives a clear split: hosting keeps your site online, and the domain is the address that leads to it.
- Keep it short. Fewer letters are easier to remember and type.
- Make it easy to say. If you must spell it on a call, it is too hard.
- Skip numbers and hyphens. People forget them.
- Pick a familiar ending. .com and .in are the most common for Indian readers.
- Check social media. It helps if the same name is free there.
- Think long term. A name that is too narrow can box you in later.
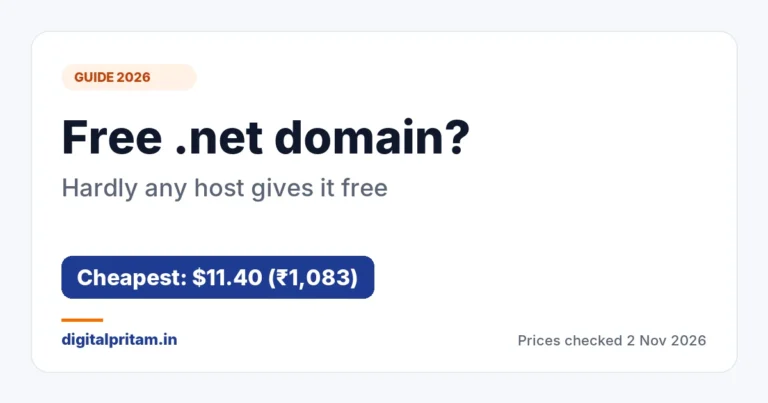
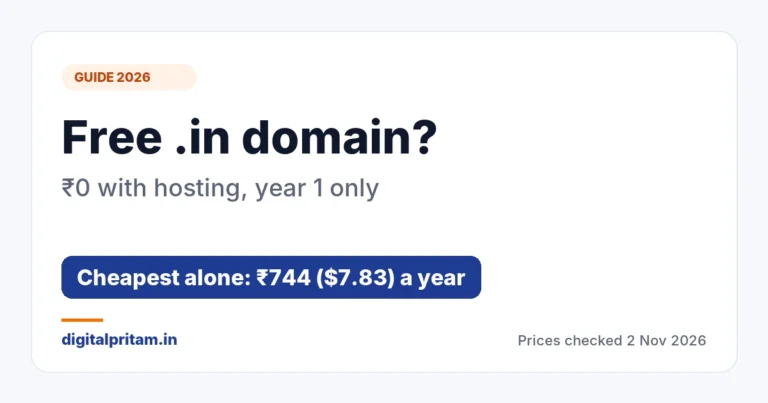
Hostinger’s FAQ says every web hosting option except the Single plan includes a free domain when you buy a yearly (or longer) plan. The Single card on the page also shows a free domain line, so confirm at checkout. The free domain must be registered within 12 months, and not every ending is eligible. Read the terms at checkout. More ideas are on our page about free domain name offers.
Step 3: Buy hosting
Hosting is space on a computer, called a server, where your blog’s files live. When someone types your address, the server sends your pages. Without hosting nobody can see your blog. For a new blog, shared hosting is enough, and you can move up later.
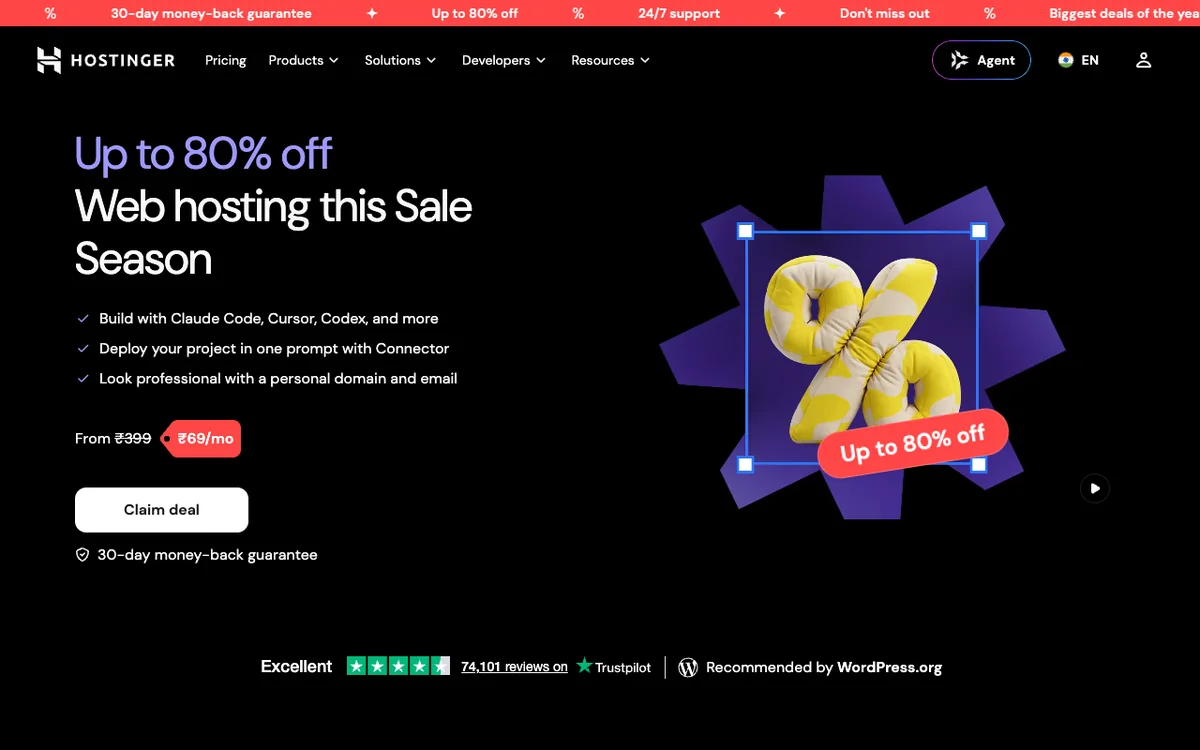
Here is what Hostinger showed on its India plan page on 15 Nov 2026. Prices are before 18% GST and paid up front for 48 months. The monthly rate is the 48-month price divided by 48. The prices were in a sale season. Hostinger lists prices without GST, so we add the standard 18% GST rate to show a rough total. Your checkout shows the final amount.
| Plan | Price a month | You pay up front | With 18% GST | Renews at (a month) |
|---|---|---|---|---|
| Single (1 website) | ₹69 | ₹3,312 | ₹3,908 | ₹289 |
| Premium | ₹139 | ₹6,672 | ₹7,873 | ₹449 |
| Unlimited (unlimited websites) | ₹199 | ₹9,552 | ₹11,271 | ₹649 |
 Pick Premium ifOur pick
- You are starting one blog and may add a second site
- You want a free domain (read the terms)
- You like the 1-click WordPress installer Hostinger mentions
- The price rises at renewal, so note the date.
Pick Single if- You want the lowest price for one site
- You will not need a second site soon
- Hostinger's FAQ says Single has no free domain. It lists 10 GB SSD and weekly backups.
A longer plan has a lower monthly price, but you pay more up front. Hostinger lists a 30-day money-back guarantee on its pages. We have not tested its checkout or refunds. Our Hostinger review and pricing guide go deeper.
Step 4: Install WordPress
WordPress is the software that runs your blog. Its own About page says it is open source and licensed under the GPLv2. Most hosts, including Hostinger, offer a one-click installer, so you do not install it by hand. We have not tested Hostinger’s installer.
What you get at the end is the same on any host: a login page at yourdomain/wp-admin and a dashboard like the one below.
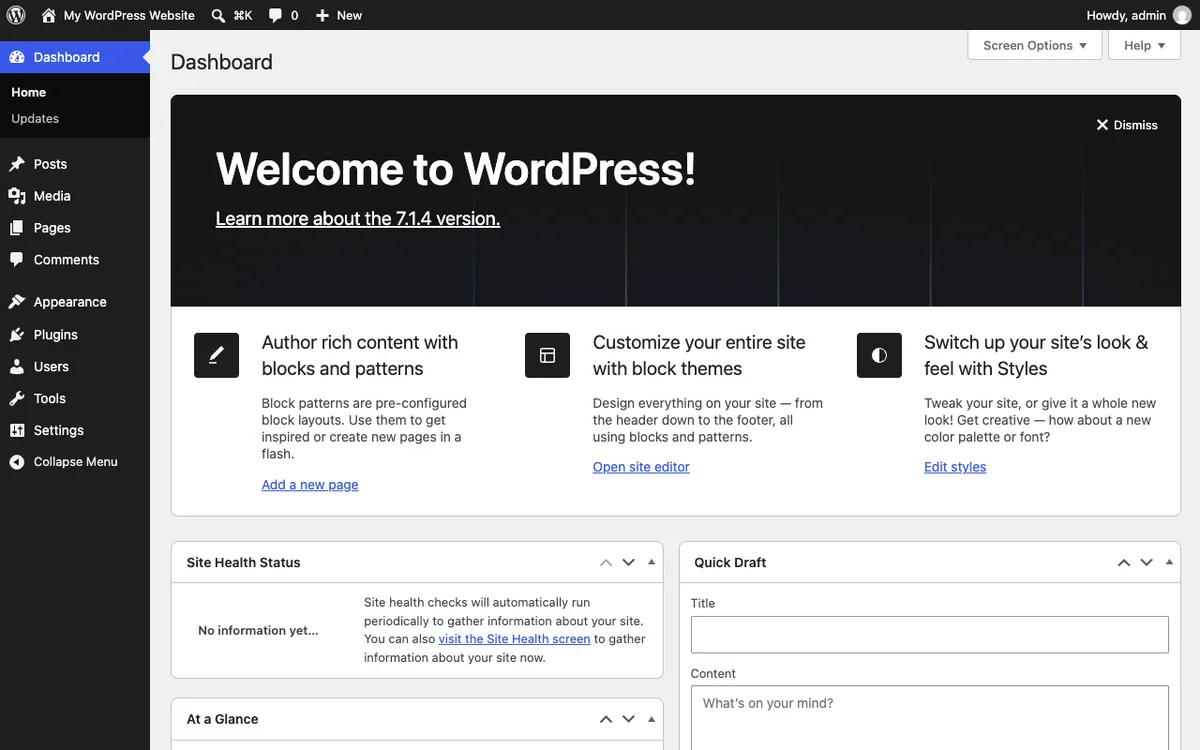
Write down your admin login and keep it safe. In step 11 we change the username, because the first one is often "admin".
Step 5: Set the basics
5a. Site title and tagline
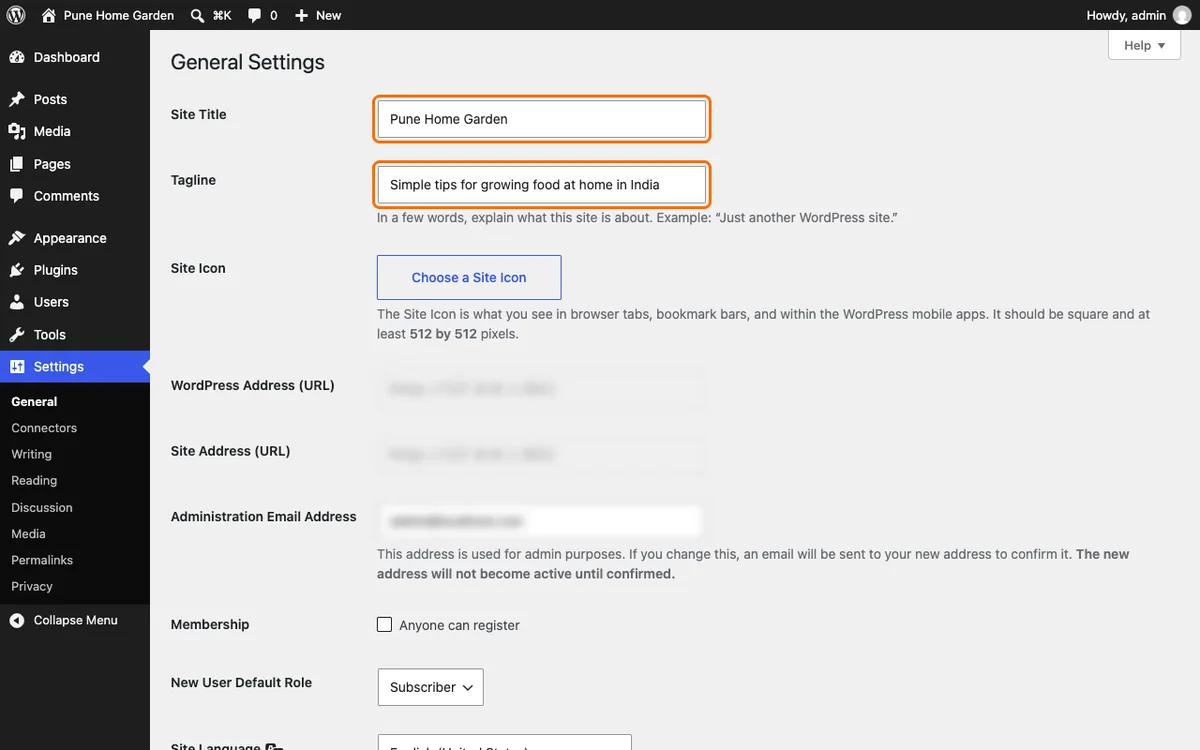
Go to Settings > General. Type your blog name in Site Title and one short line in Tagline, then click Save Changes. Google and your theme use these. This screen also has a Site Language setting.
You can blog in Marathi or Hindi too. Before you decide on link names, paste a test link into WhatsApp and see how it looks. English link names are often easier to share.
5b. Clean links
Go to Settings > Permalinks and choose Post name. Your links then read like /how-i-start-tomato-seeds/ instead of ?p=123. WordPress itself says the post name tag makes links easier to understand. Click Save Changes.
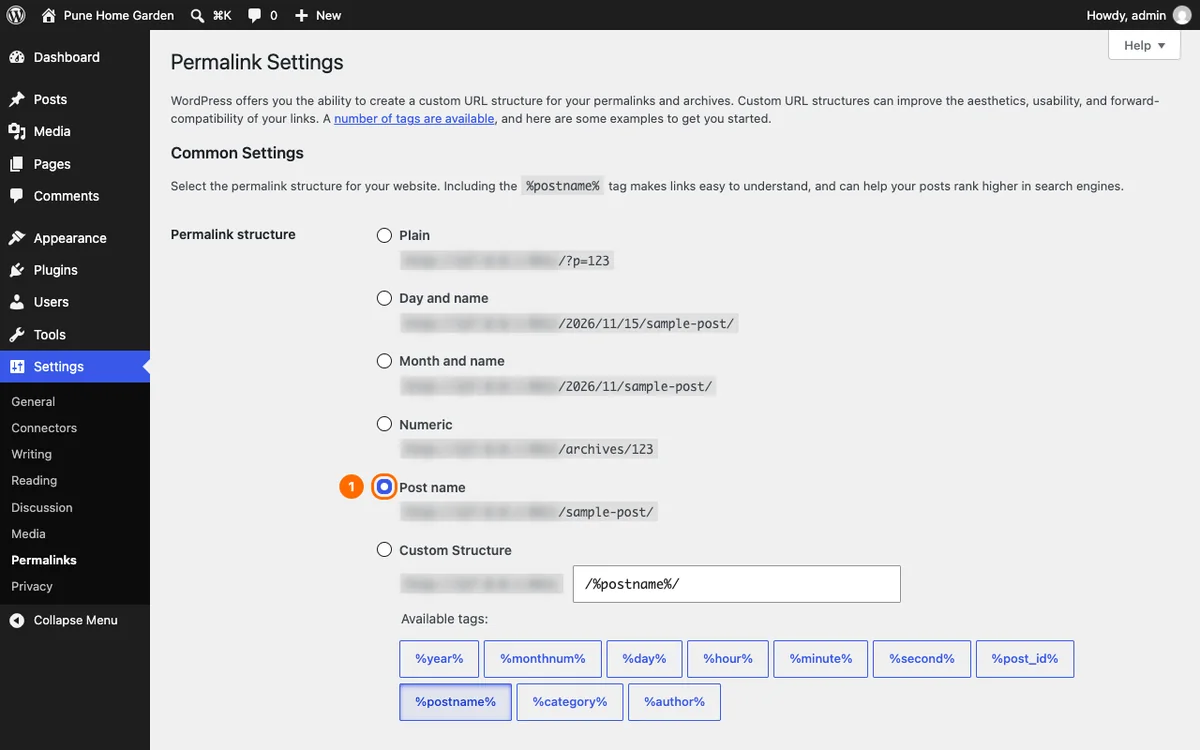
Choose your link style before you publish. Changing it later changes every post link, and old links can break.
Step 6: Pick a theme
A theme controls how your blog looks. Go to Appearance > Themes > Add Theme to browse. Many good themes are free. Start with a free, lightweight one, make your blog work, and change the look later.
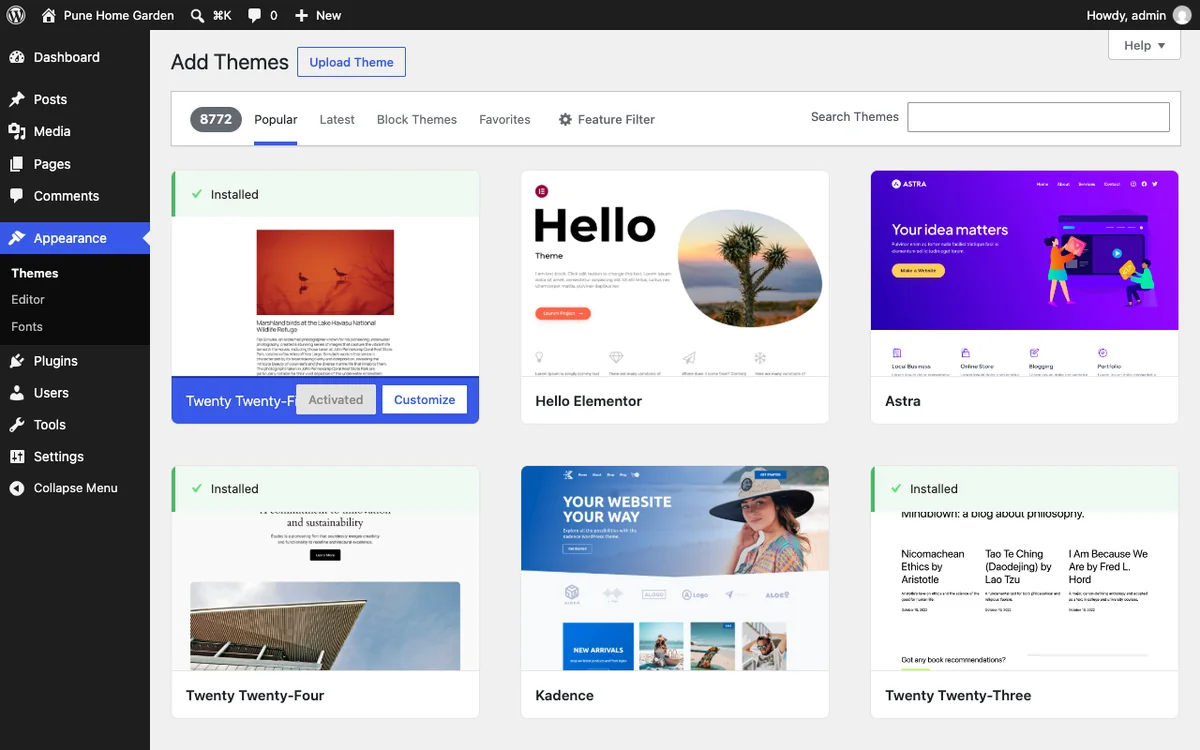
- Look at the demo on a phone. Most readers will use one.
- Check the date. A theme that has not been updated for a long time is a risk.
- Read reviews from people with a blog like yours.
- Do not buy a theme yet. A free one is enough to launch.
We keep a list of WordPress themes we have looked at, with prices.
Step 7: Write and publish your first post
This is the step that makes it a blog. We did it on the test site. It took a few minutes.
7a. Open a new post
Go to Posts > Add New. You see an empty page with a box that says Add title. The right side has settings.

7b. Type your title and text
Click the title, type a clear headline, and press Enter. Write your first paragraph. WordPress turns each paragraph into a block.
7c. Add a heading
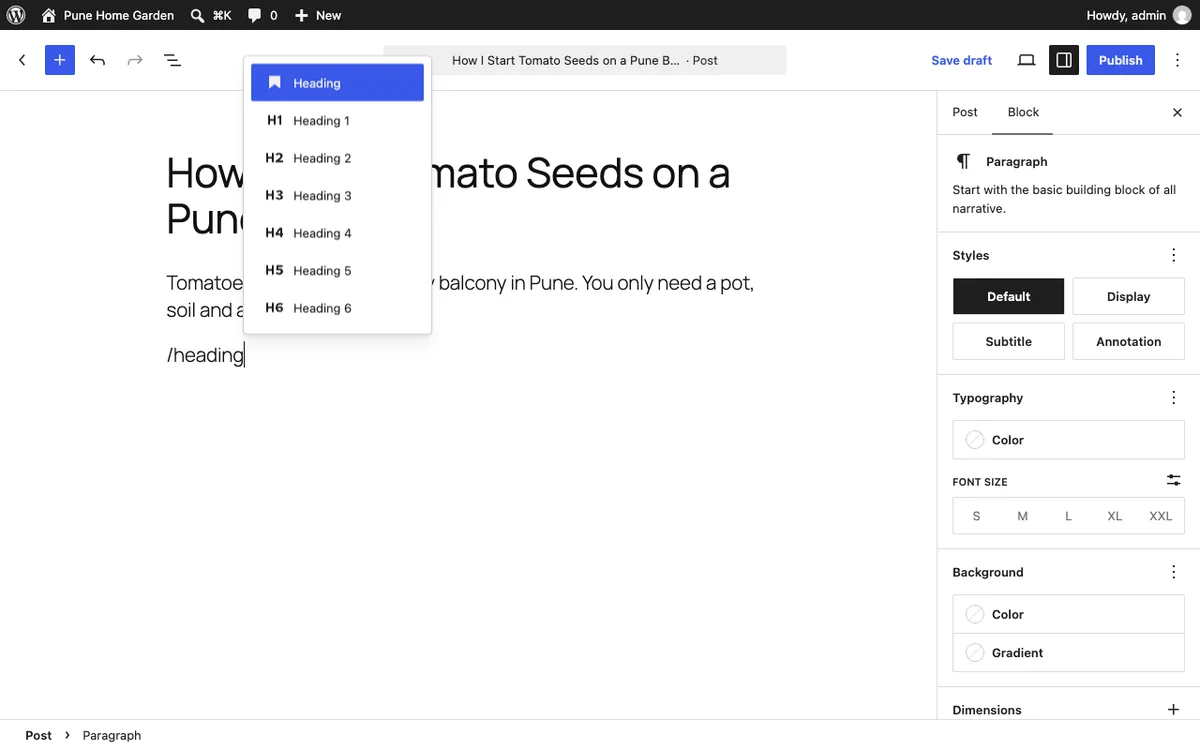
On a new line, type a slash and the word heading. A menu of heading blocks opens. Press Enter for a normal heading, then type it. Headings split a post into parts that are easy to scan.
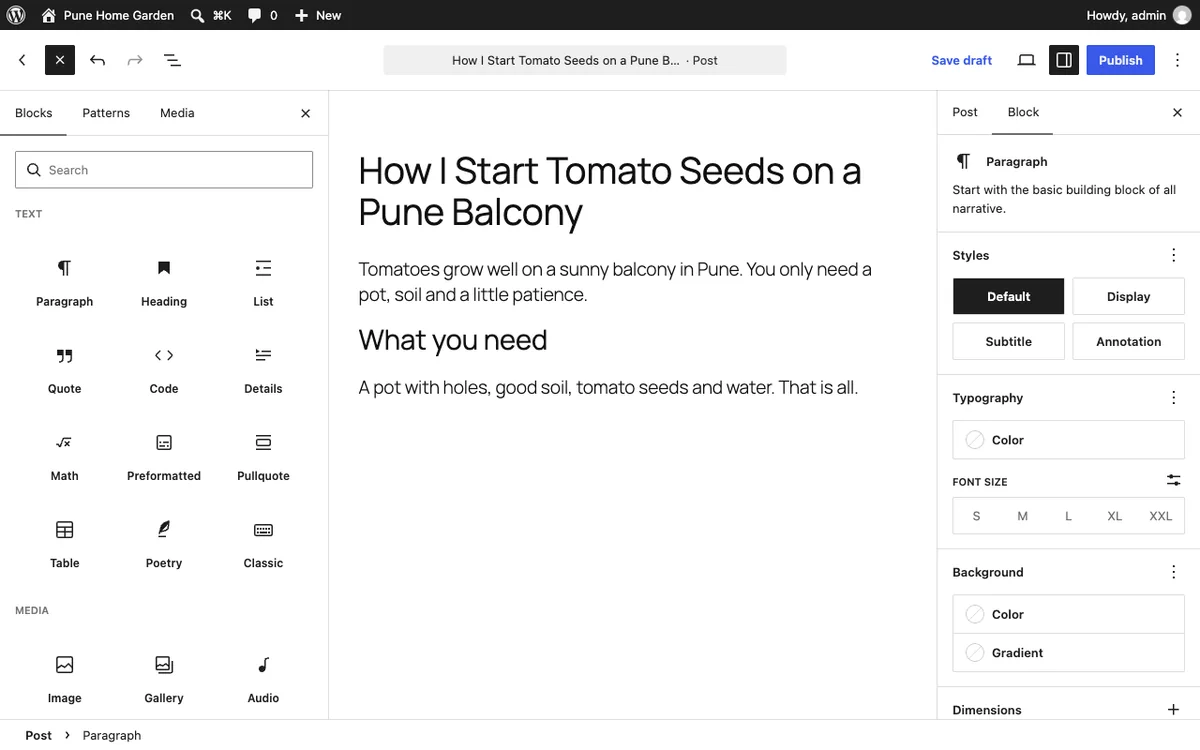
The plus button at the top left opens the full list of blocks: paragraph, heading, list, image, quote, table and more.
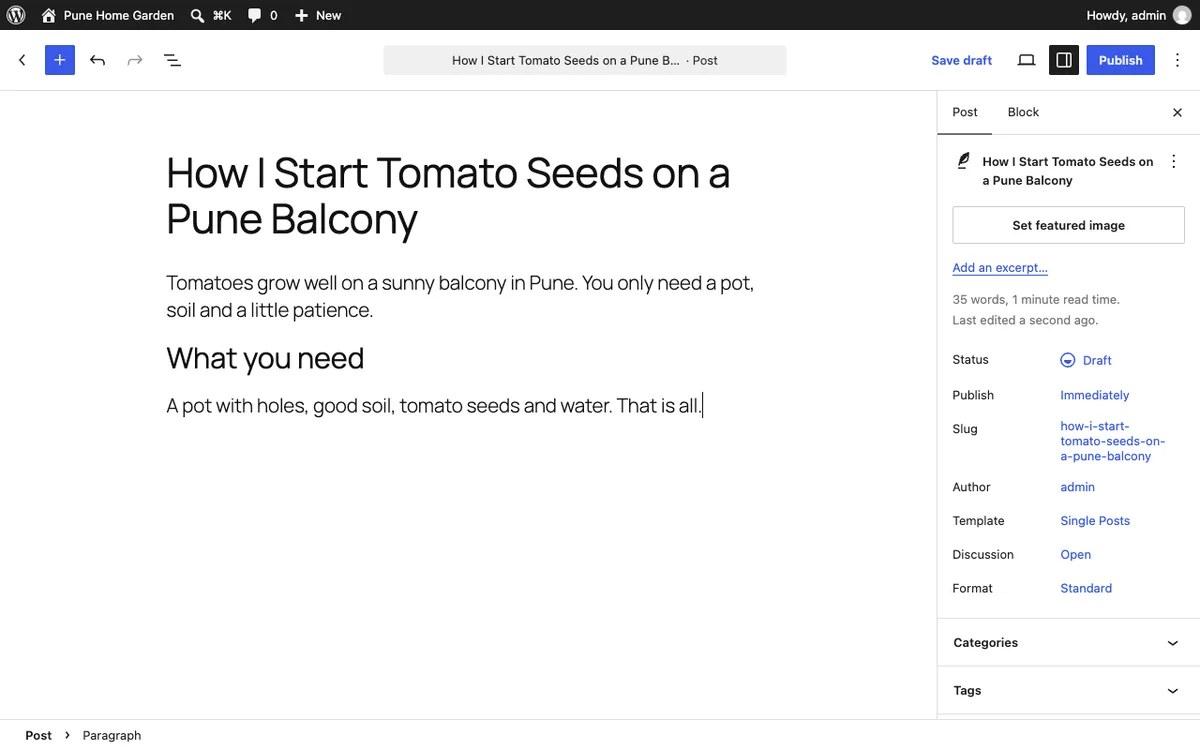
7d. Check the post settings
Click the Post tab on the right. Here you can add a featured image, change the slug (the end of the link), pick a category and read how long the post is.
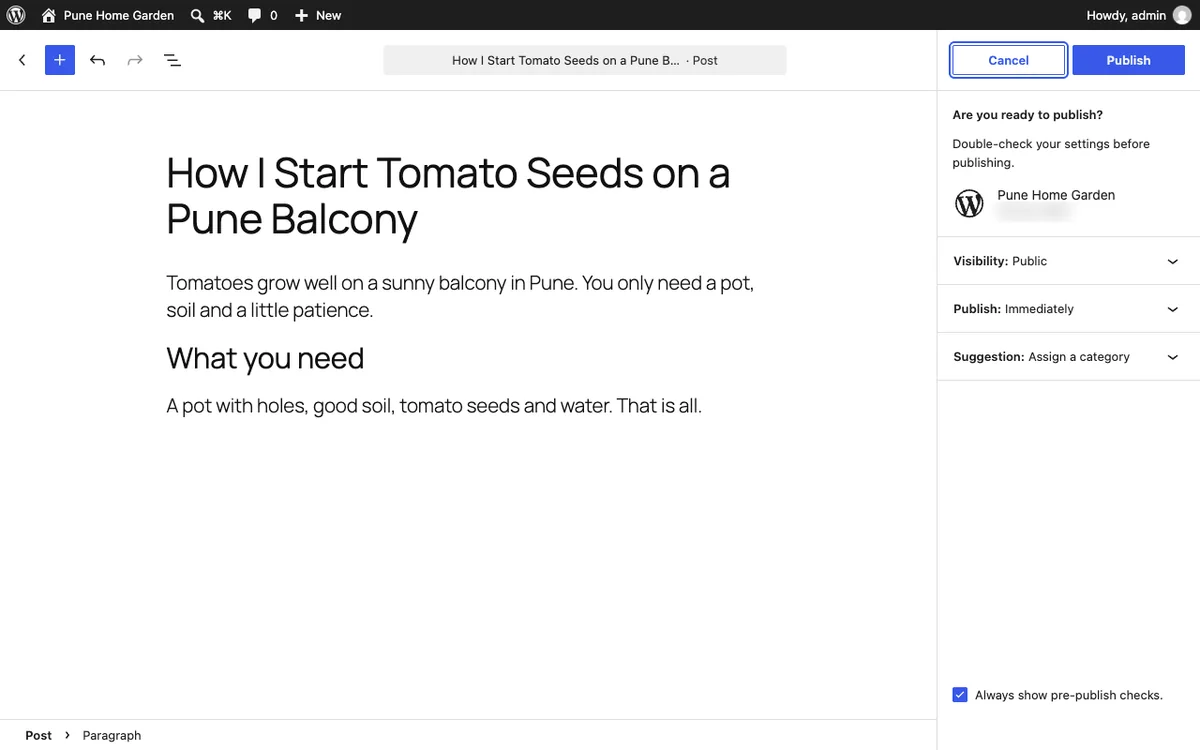
7e. Publish
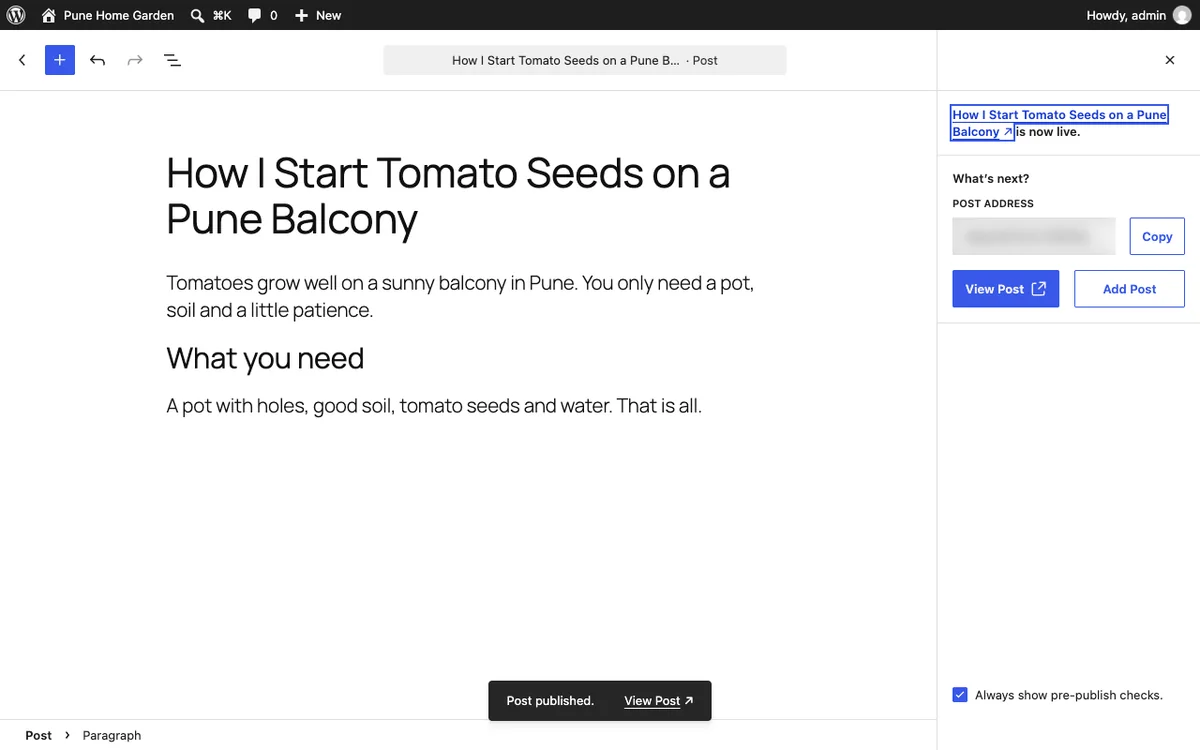
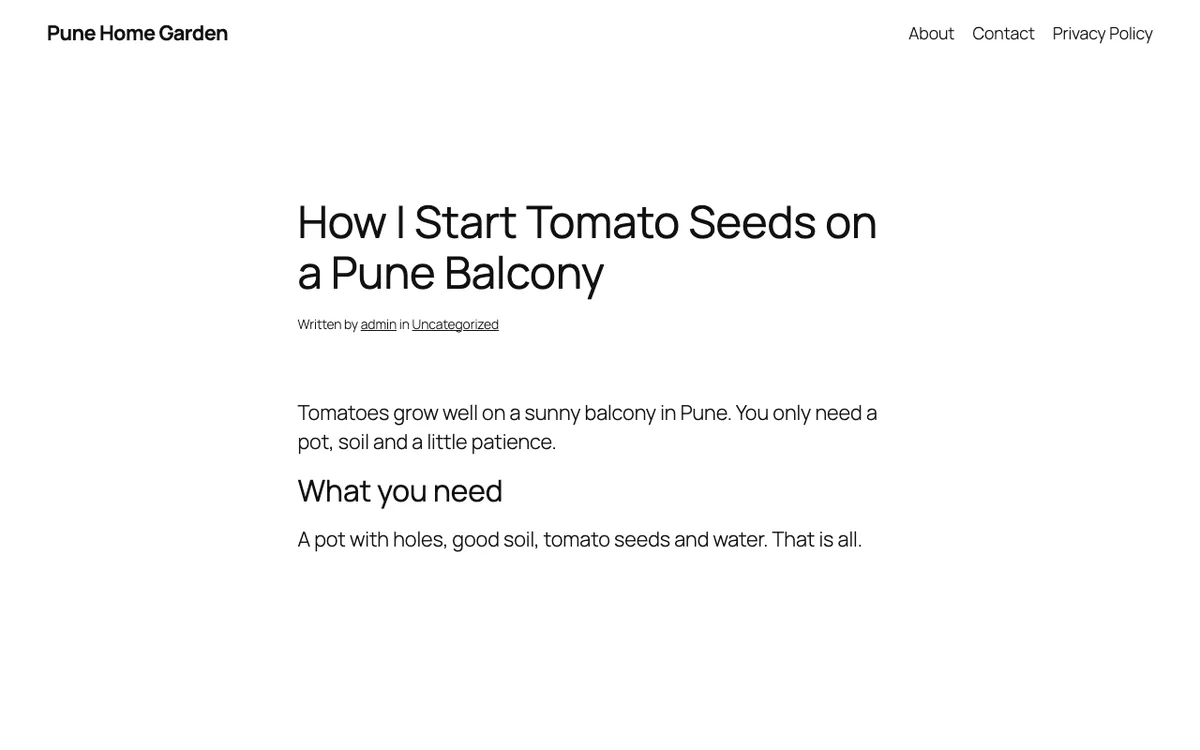
Click Publish. WordPress asks if you are ready, then click Publish again. A panel tells you the post is live and shows its address.
Write for one reader. Imagine a friend who asked your question, and answer it fully in short sentences. Aim to publish your first three posts before you tell anyone about the blog.
Step 8: Add the essential pages
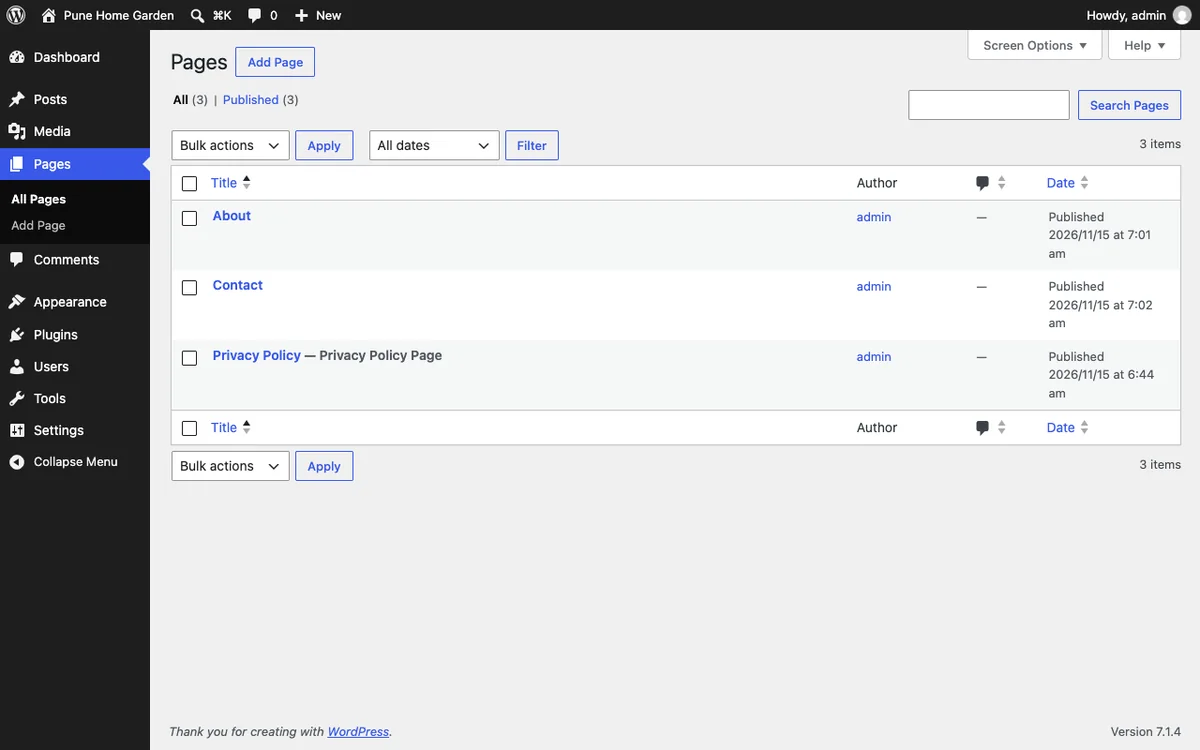
Blogs also need a few fixed pages. Go to Pages > Add Page for each one.
- About. Who you are and why you write. Readers trust blogs with a real person behind them.
- Contact. A way to reach you, such as an email address or a form.
- Privacy Policy. What data your blog collects and how you use it.
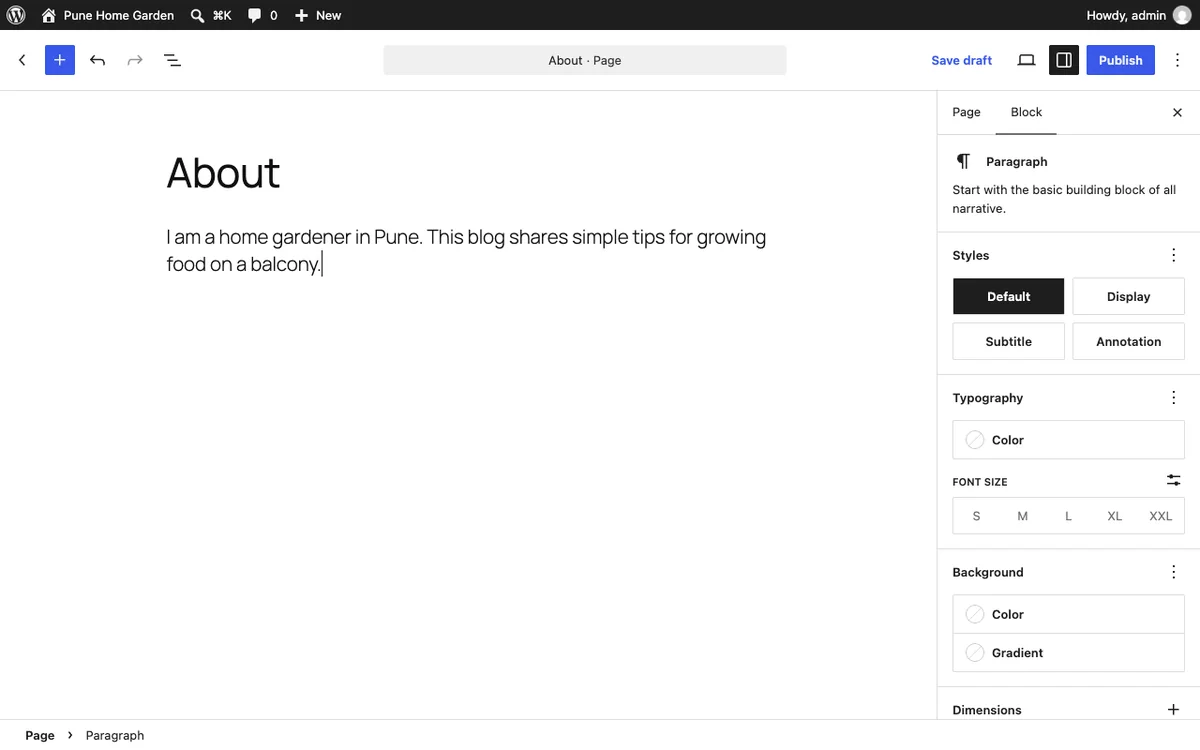
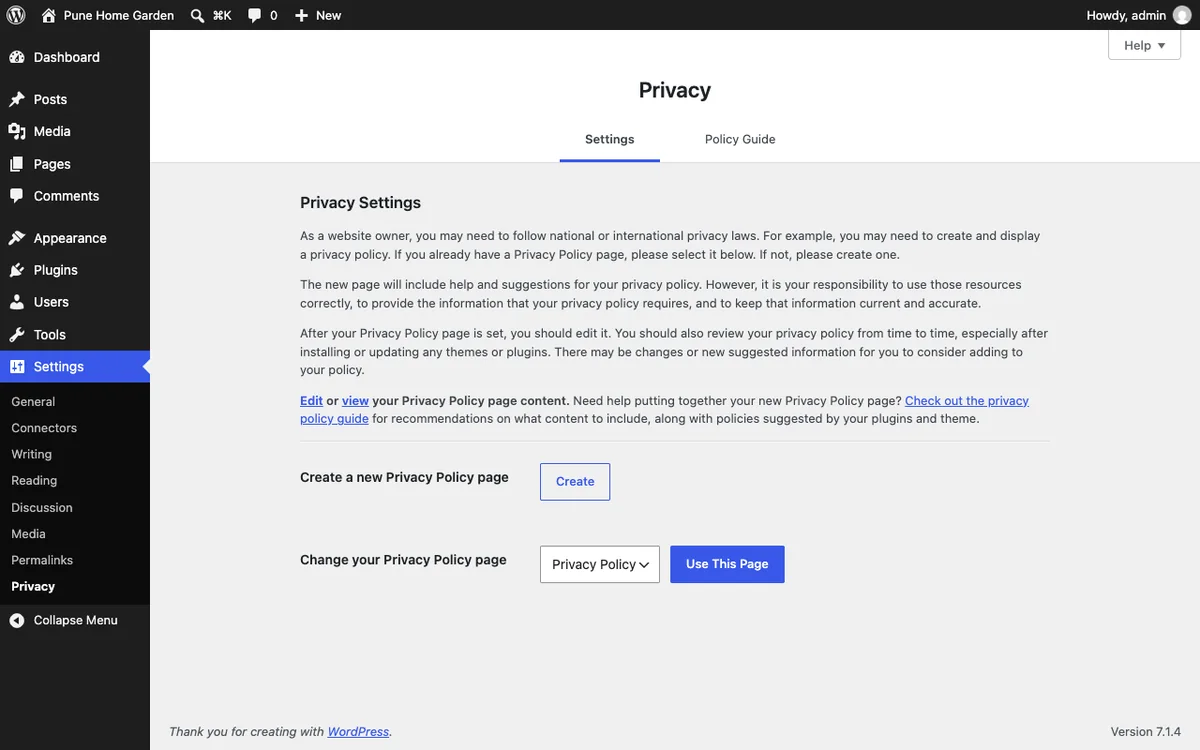
WordPress has a Privacy screen under Settings > Privacy where you pick which page is your policy, and a Policy Guide with suggestions. It says it is your job to keep the content correct and current. Ask a professional if you collect personal data.
Step 9: Set up basic SEO
SEO means making your posts easy to find on Google. Google’s own SEO Starter Guide says to create helpful, reliable content for people. For a new blog, these basics are enough.
- Write for one question per post. Put the answer near the top.
- Use clear titles and headings. Say what the post covers.
- Keep links clean. You already did this in step 5.
- Link your own posts to each other where it helps the reader.
- Name your images and add short alt text that describes them.
- Add Google Search Console later (search.google.com/search-console) to see which searches reach you. We did not set it up on the test site.
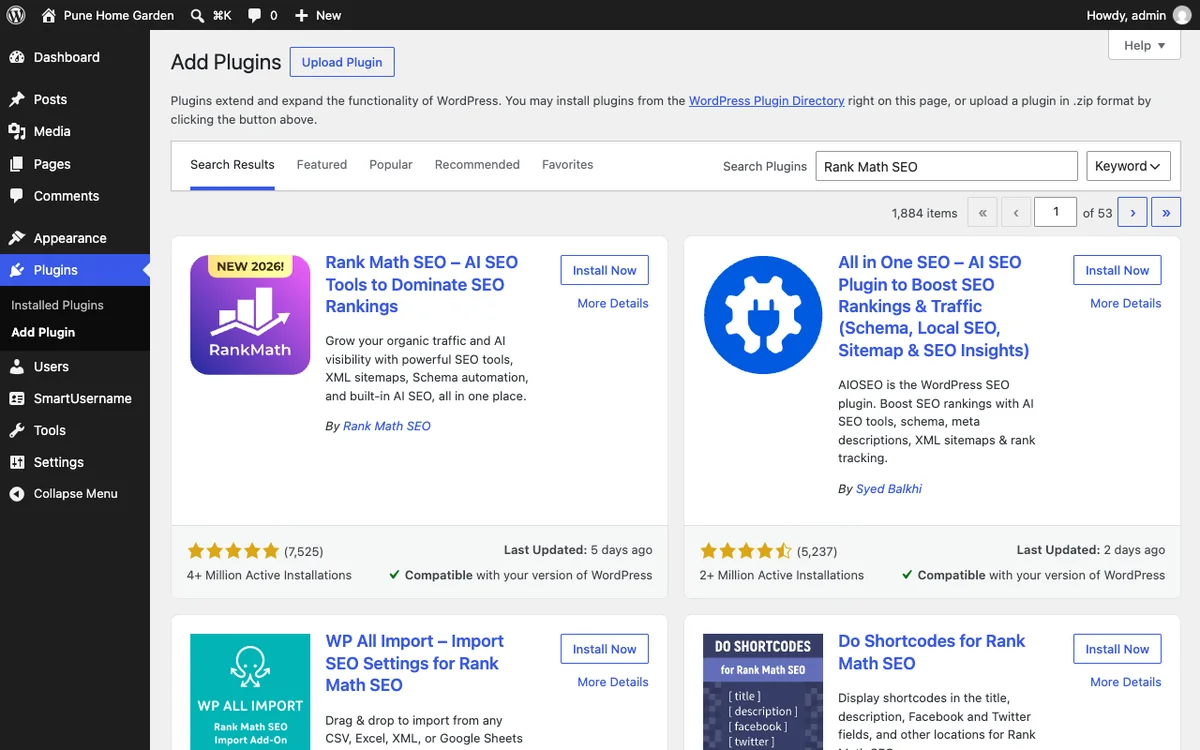
An SEO plugin can help with titles, descriptions and sitemaps. You can search for one from Plugins > Add Plugin. We use Rank Math on this site. We only searched for it on the test site and did not install it there.
To go deeper, read what is SEO, how to do keyword research and our 19 SEO tips.
Step 10: Keep your blog updated and healthy
A blog is not set and forget. Two screens on your dashboard take a minute and catch most simple problems.
10a. Updates
Go to Dashboard > Updates. It shows your WordPress version and whether plugins and themes are up to date. Run updates when it asks, and take a backup first if your host offers one. Hostinger lists weekly backups on the Single plan and daily on Unlimited.

10b. Site Health
Go to Tools > Site Health. WordPress checks your setup and lists critical issues and recommended improvements, each with a Security or Performance tag. Click an item to read what to do.
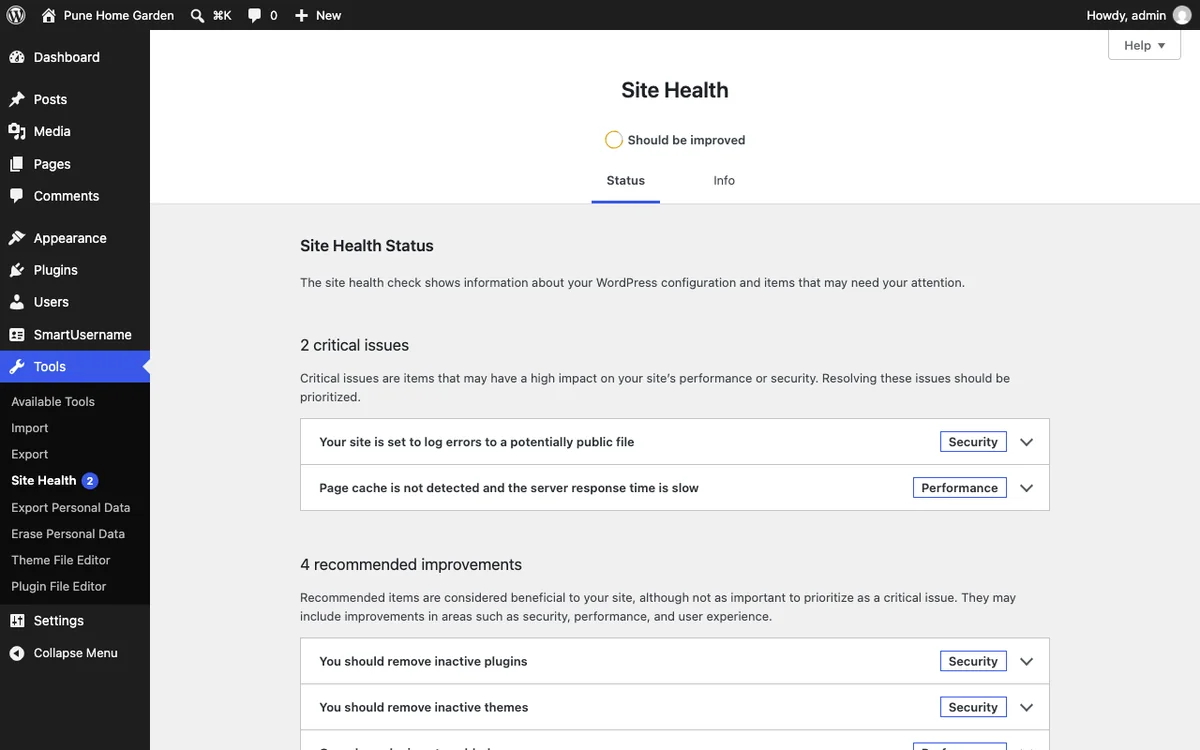
Delete themes and plugins you do not use. Site Health also suggests removing inactive ones.
Step 11: Change your WordPress login username (and why)
We make SmartUsername, the free plugin used below, so weigh our advice with that in mind. It is free on WordPress.org. The manual way needs no plugin, and we show it too.
Your username is half of your login. If it is admin, your real name or your site name, an attacker only has to guess the password. Login attacks try names like these first, and WordPress shows login names in more places than most people expect. WordPress gives no button to change one. We tested everything below on the local test blog.
What a leaked login name looks like
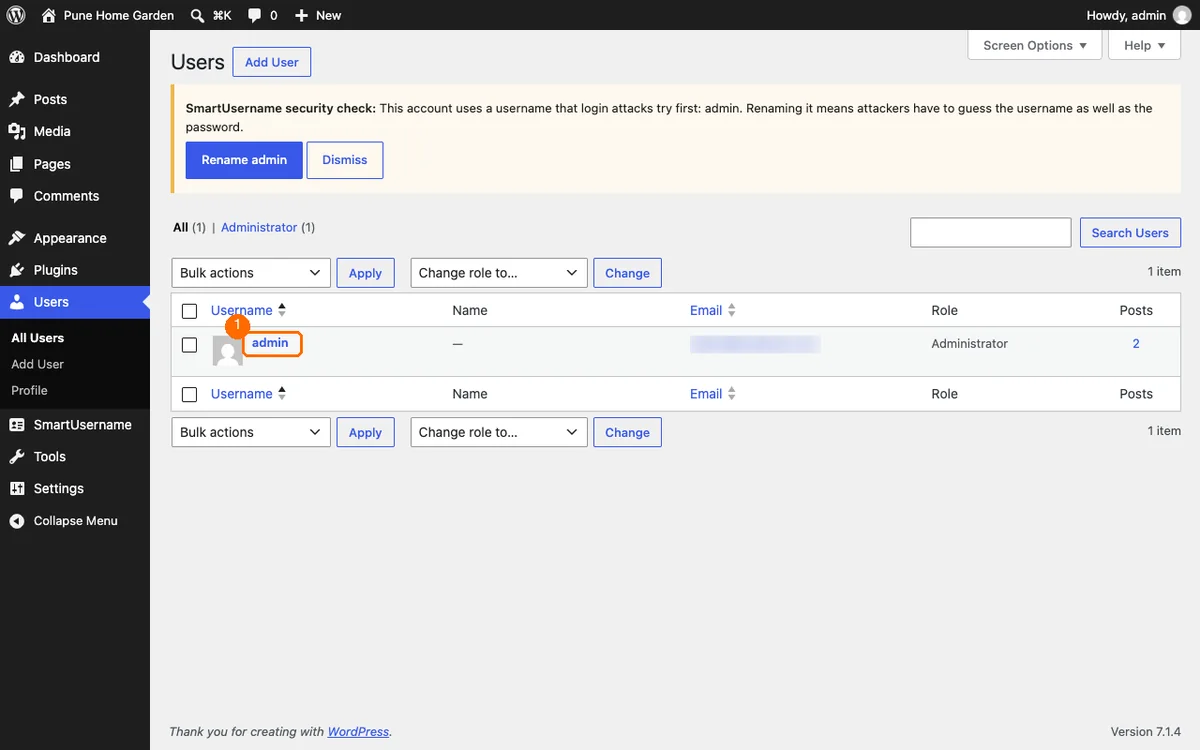
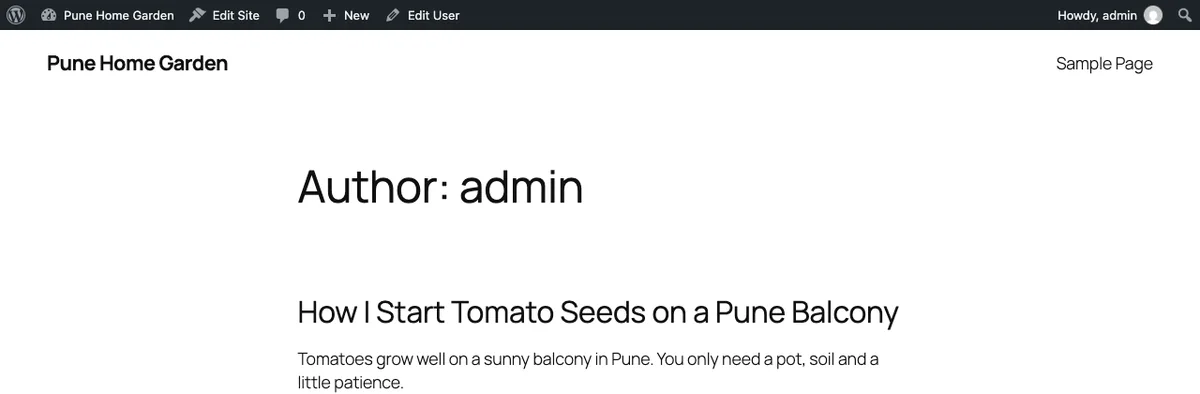
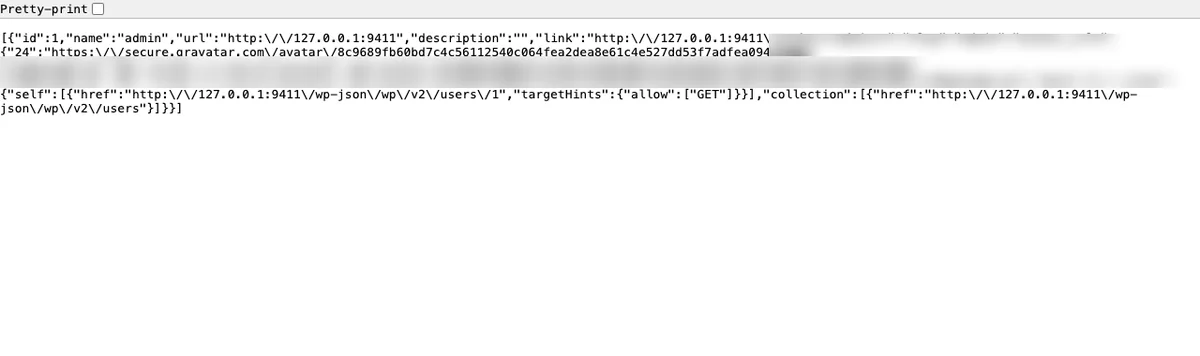
On the test blog the account was called admin. Here are the three places where it showed up before we changed anything.

Anyone can open yourblog/?author=1. WordPress redirects to the author page, and the address and the page title show the login name.
The REST users list at /wp-json/wp/v2/users is public by default. It showed the same name in the slug field.
SmartUsername’s own page lists more places where a login name can show: the users sitemap, embeds, author URLs, login error messages and display names.
Method 1: The manual way (no plugin)
This is the method our full guide covers: create a new administrator, then delete the old account and give its posts to the new one. We ran these screens on the test blog. Our tested guide how to change your WordPress username also covers WP-CLI and phpMyAdmin, which we did not repeat here.
- 1. Back up your site first.
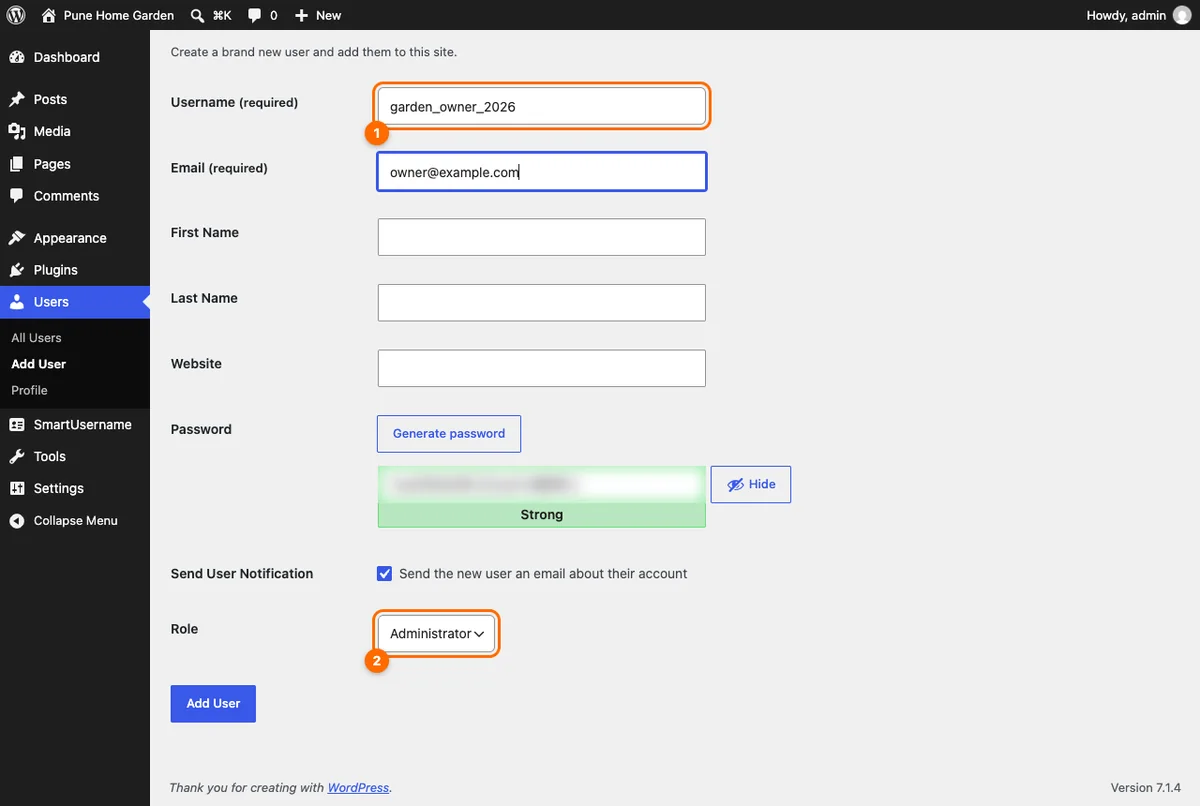
- 2. Go to Users > Add User. Type the new username and an email address, and set the Role to Administrator.
- 3. Click Add User, then log out and log in as the new administrator.
- 4. Go to Users, find the old account and click Delete.
- 5. Choose Attribute all content to another user, pick the new administrator, and click Confirm Deletion.
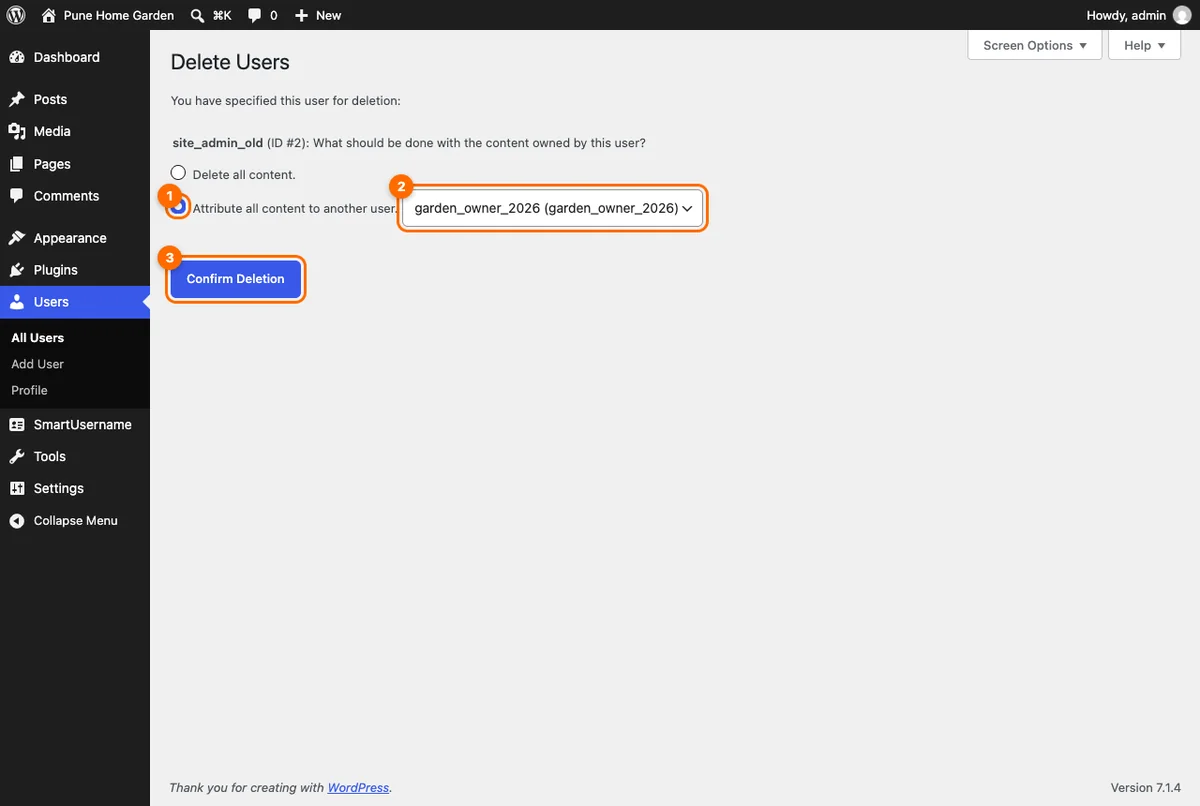
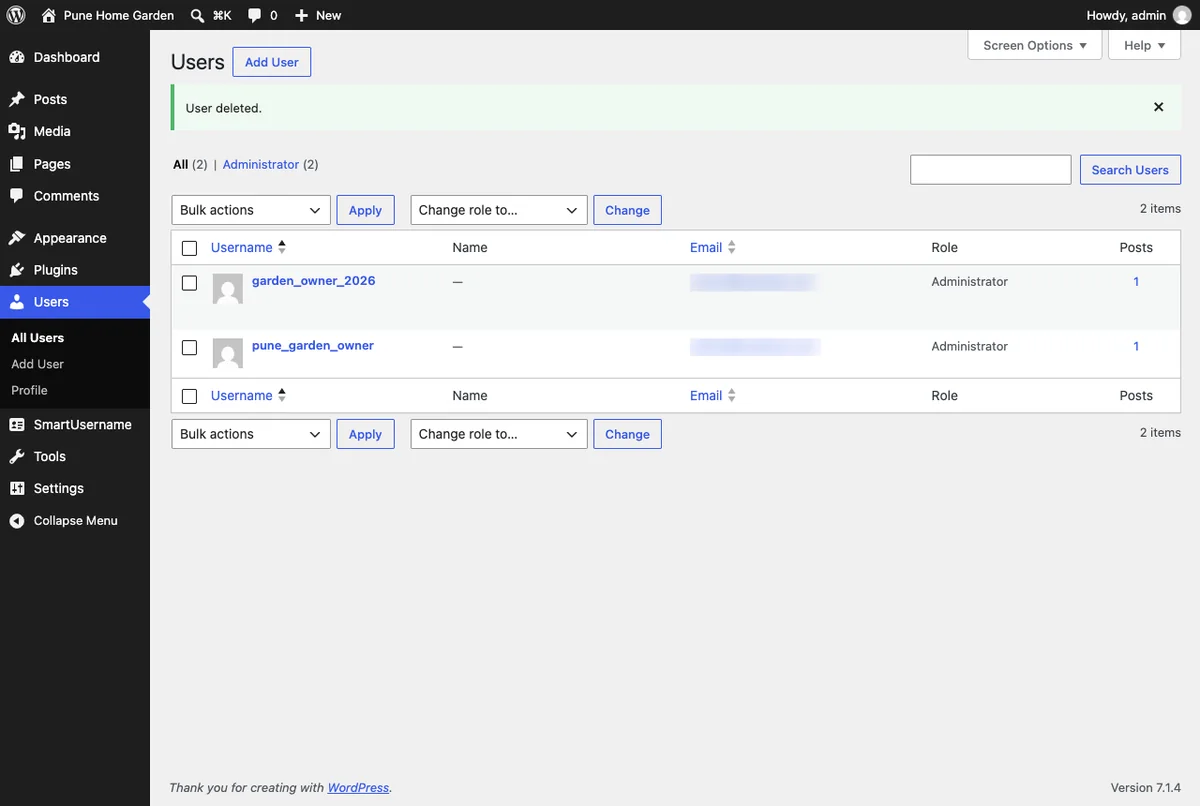
Do not pick Delete all content. That deletes the old account's posts. Always attribute them to the new administrator.
Method 2: SmartUsername (renames the account in place)
SmartUsername renames the existing account, so posts, comments, roles and the password stay attached to the same user. Its WordPress.org page lists WordPress 5.3 or later and says it was tested up to WordPress 7.1. We used version 1.5.0.
Install. Go to Plugins > Add Plugin, search for SmartUsername, then click Install Now and Activate.
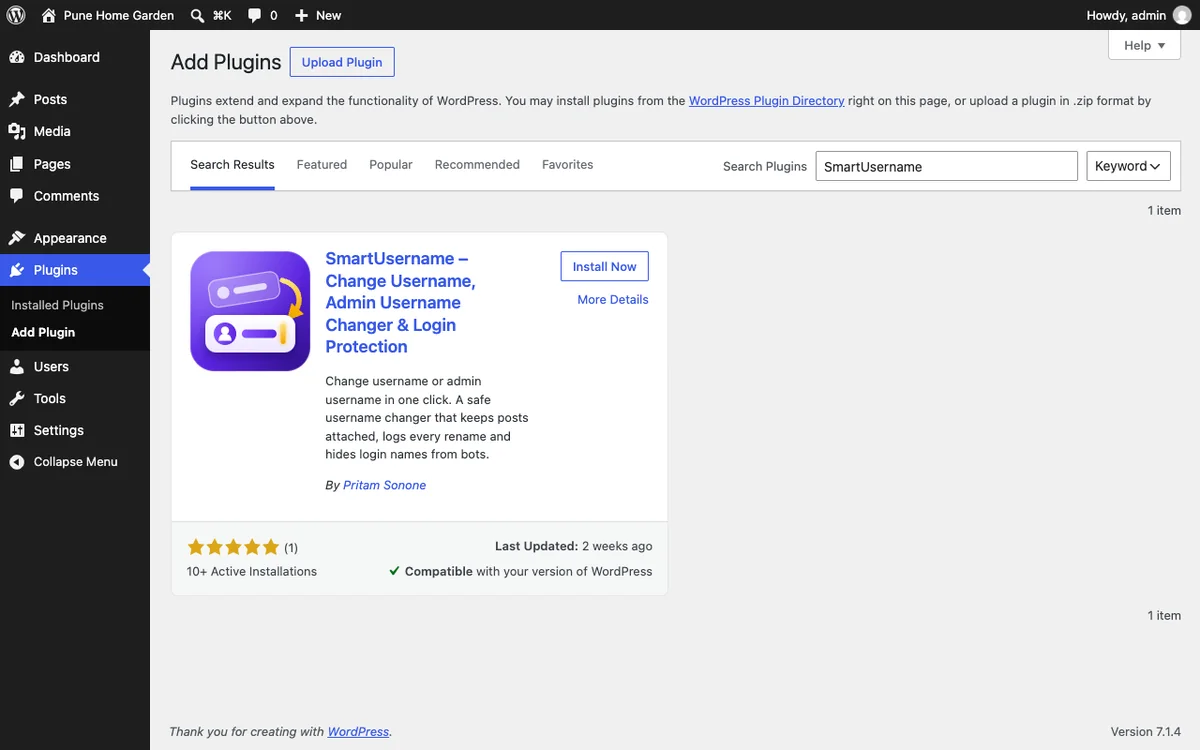
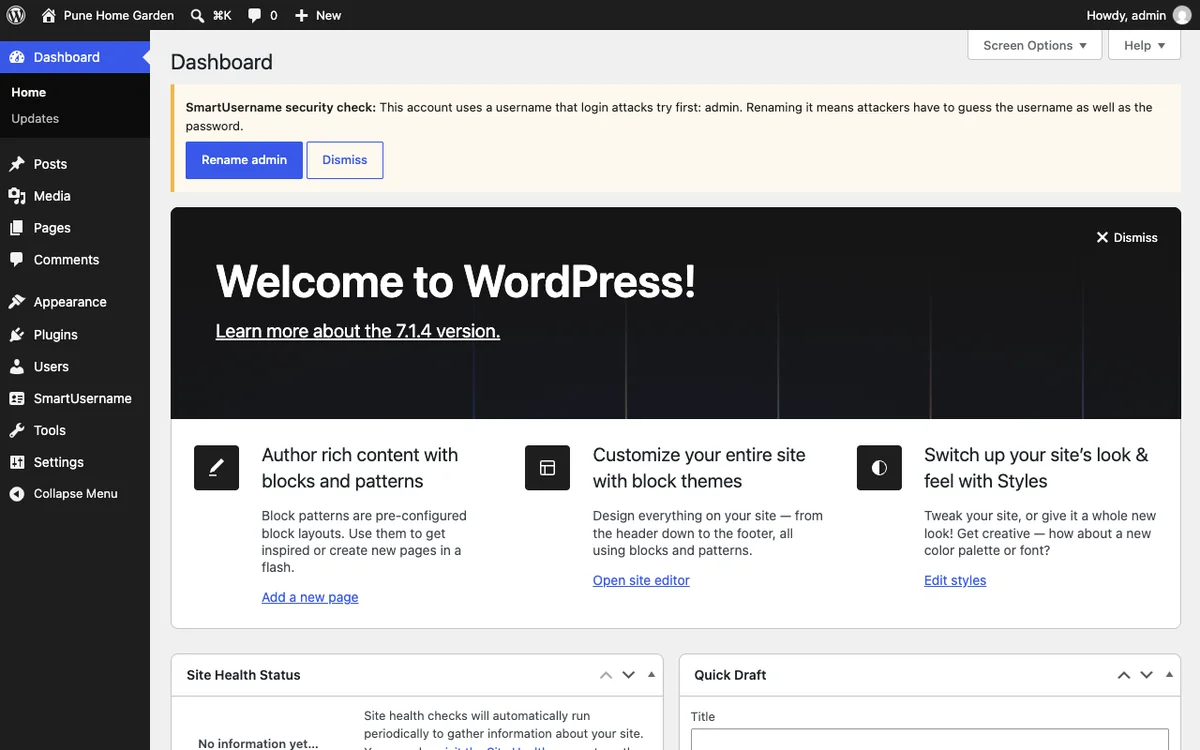
As soon as it was active, a security check appeared on the Dashboard and Users screens. It said the account used a username that login attacks try first, with a Rename admin button.
Rename. Open SmartUsername > Change Username. Pick the user, type the new name, and tick the box that says it is your own account. Open Options. We left both boxes on: update the author URL, and block the old username. Then click Change username.

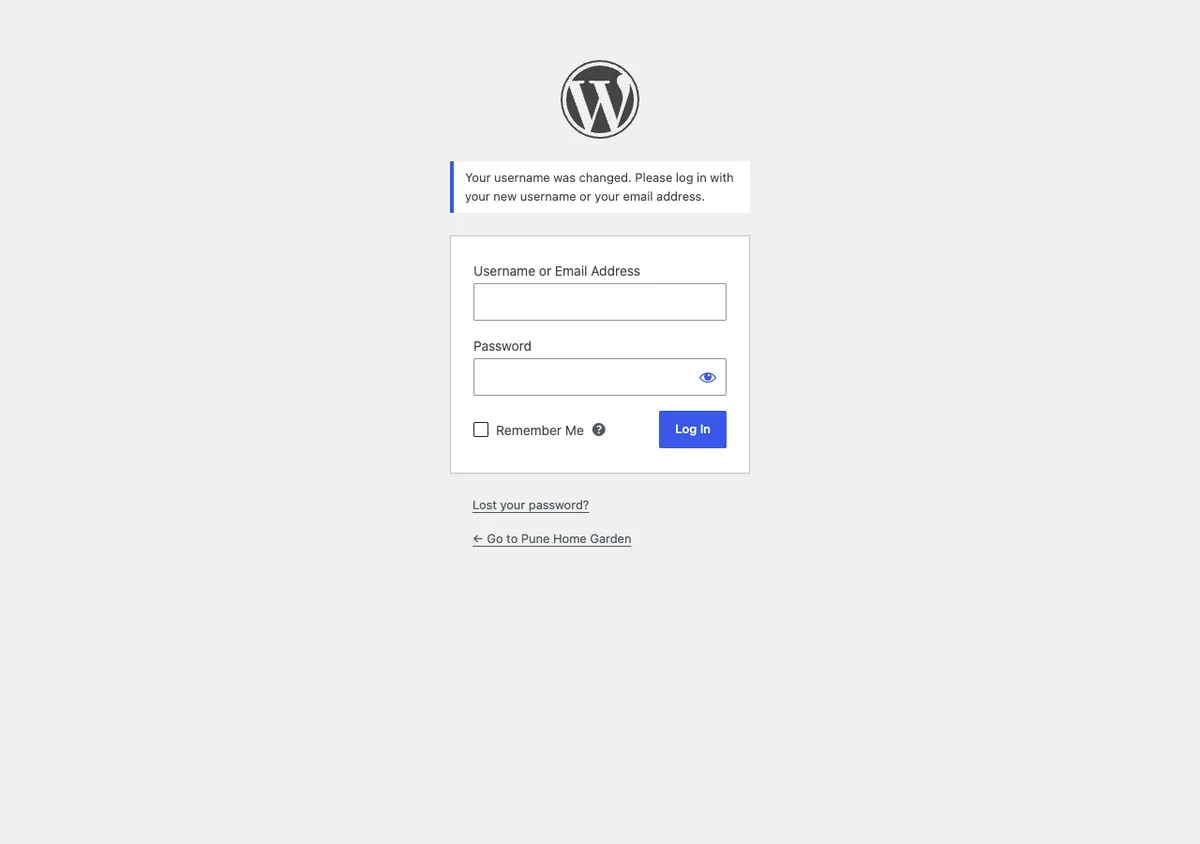
WordPress signed us out and showed the login screen with a message that the username was changed. We logged in again with the new name and the same password.
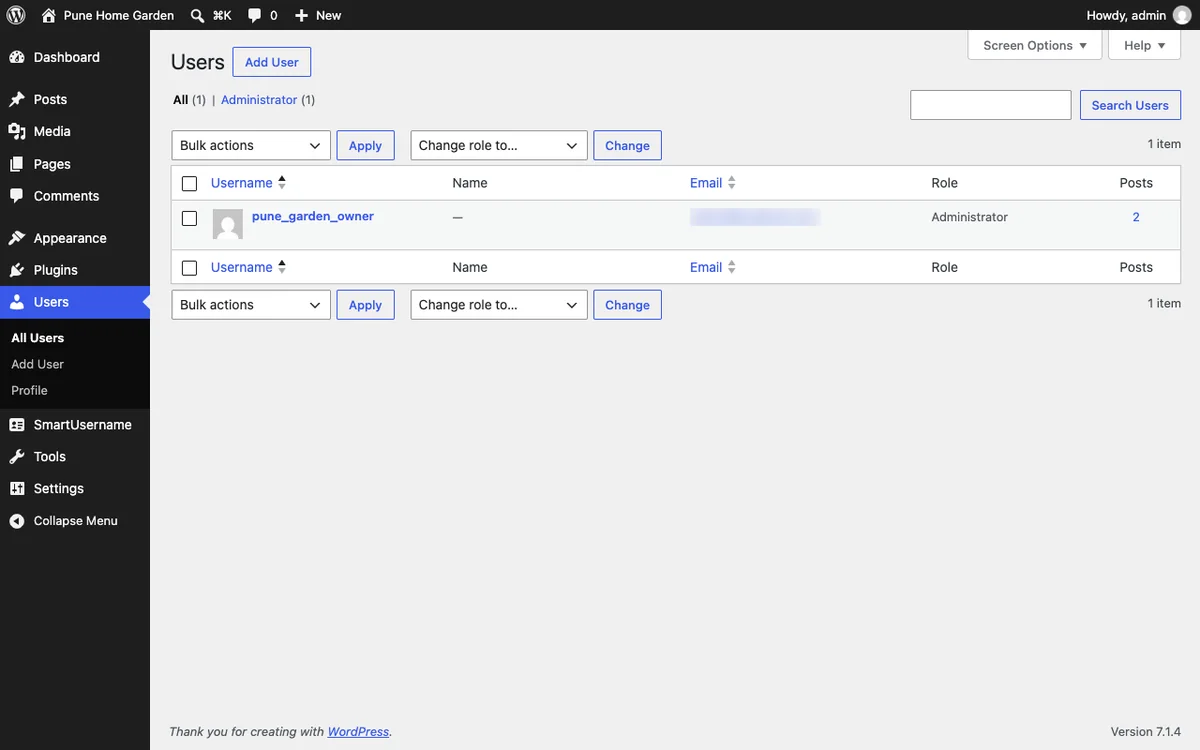
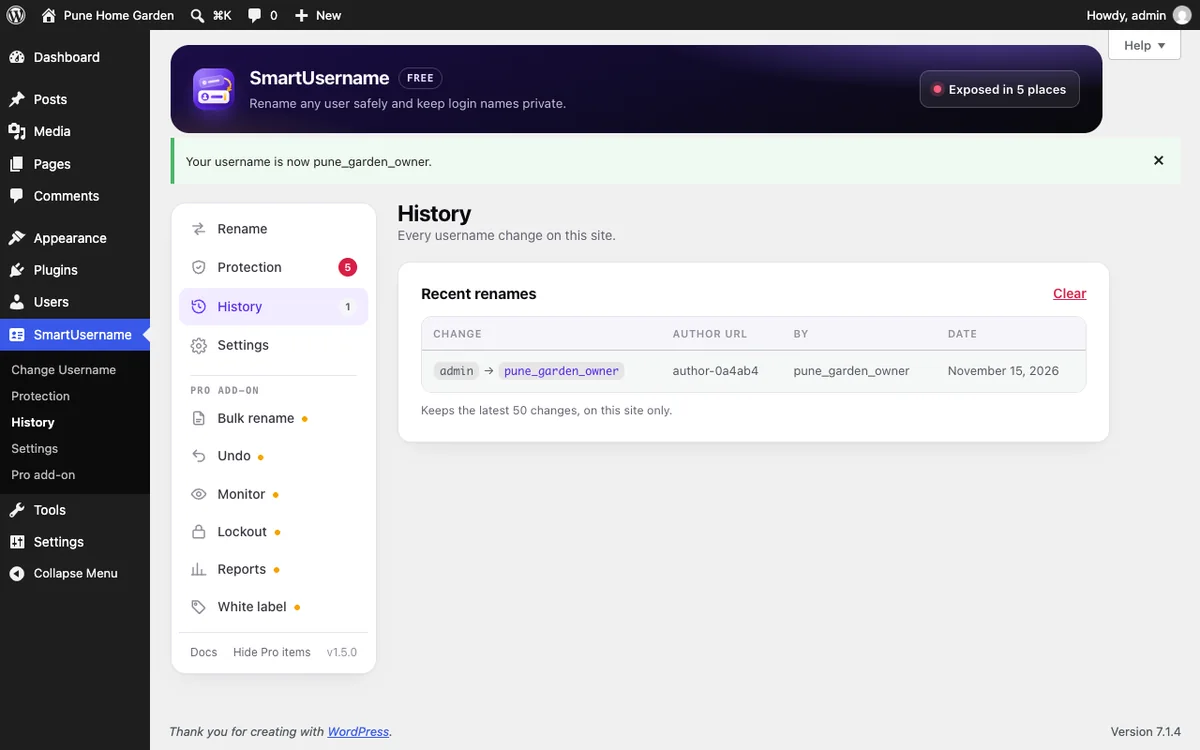
Hide what is left. Open the Protection tab. It showed login names visible in 5 places. We clicked Hide login names now. It then showed 8 of 8 places hidden.

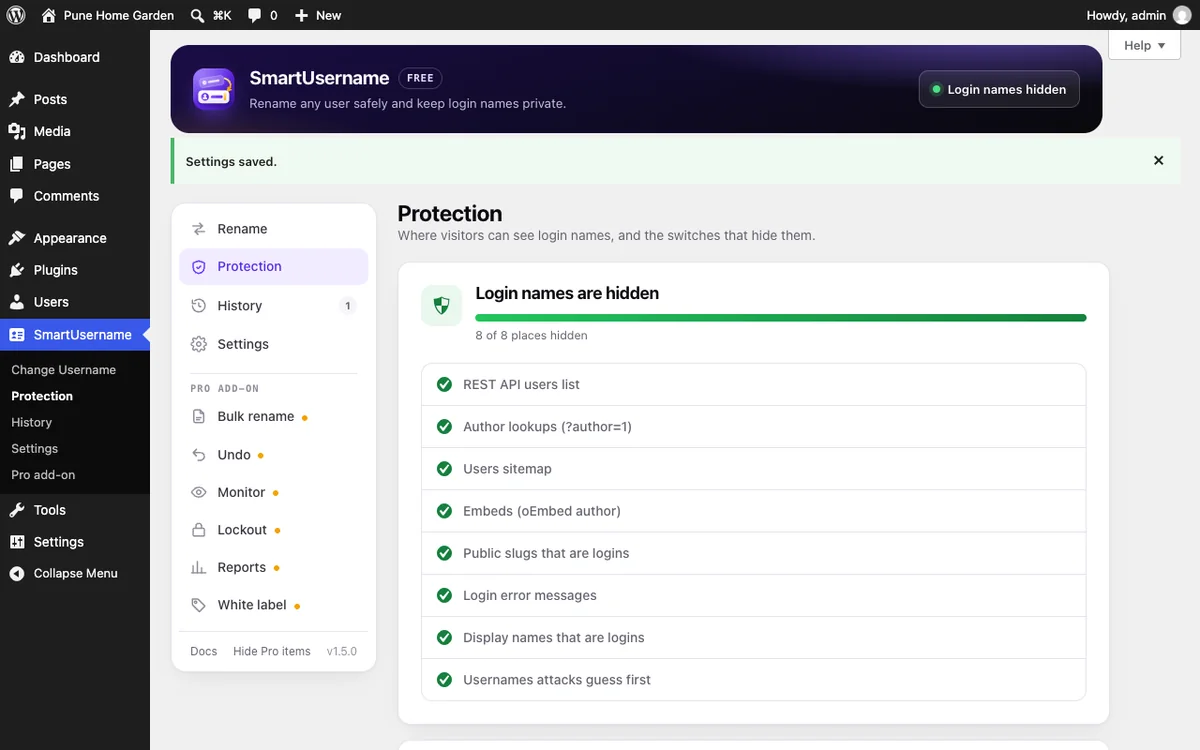
We checked the result as a visitor. The public REST users list now answers that listing users is not allowed, and /?author=1 sends visitors to the home page.
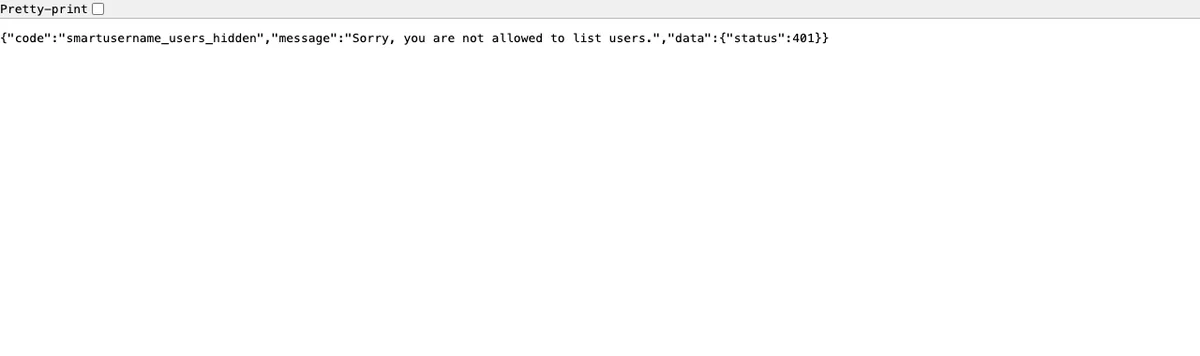
SmartUsername hides login names from public pages as its page documents. It does not make your site attack-proof. Use a long, unique password too.
Check a real site
Our free username checker reads only public pages. We ran it on this site. It reported “Partly hidden”, and the one name it could read is masked here.
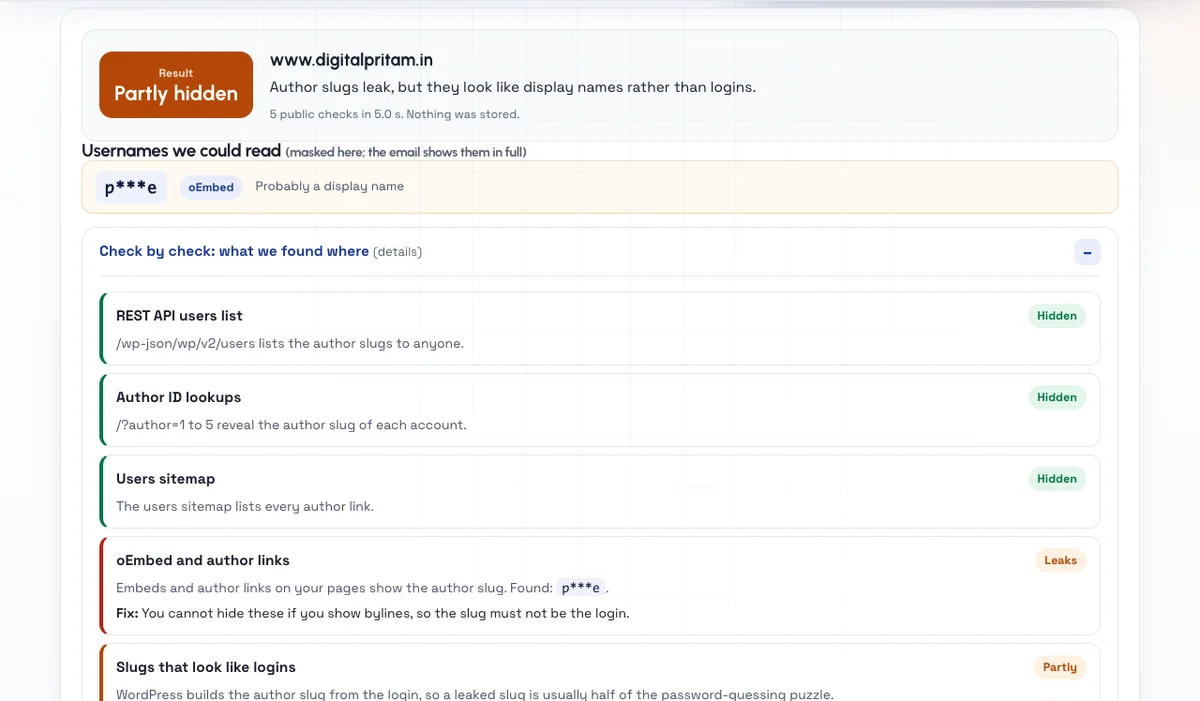
Try it on your own blog with the WordPress username checker. For the full method list, read how to change your WordPress username.
Step 12: Tell people about your blog
Once you have three good posts, start sharing. Promotion for a new blog can be simple.
- Share each post where your readers already are, like WhatsApp groups, LinkedIn or YouTube comments.
- Answer questions in forums and groups, and link to a post only when it truly helps.
- Write to people you mention. A short note is fine.
- Add an email signup so readers can come back.
- Look at your own posts every month and improve the ones people read.
Real growth is slow. Keep a steady rhythm instead of a big burst.
What it costs to start a blog in India
The big costs are hosting and a domain. This table uses the Premium plan and Hostinger’s page on 15 Nov 2026.
| Item | Before GST | With 18% GST | Note |
|---|---|---|---|
| Premium hosting, 48 months | ₹6,672 | ₹7,873 | Paid up front, in a sale season |
| Domain, first year | Free | Free | Offer has terms. Check the renewal price at checkout |
| Theme | ₹0 | ₹0 | A free theme is enough to start |
| Basic plugins | ₹0 | ₹0 | Free versions cover the basics |
| SmartUsername | ₹0 | ₹0 | Free plugin on WordPress.org |
| Renewal after the first term | ₹449 a month | ₹530 a month | Check before it renews |
Mistakes new bloggers make
- Picking a topic only for money. You will run out of interest.
- Buying too much, too soon. One plan and a free theme are enough.
- Leaving the username as admin. See step 11.
- Skipping the basic pages. Readers and programs look for them.
- Changing links after you publish. It can break old links.
- Copying other blogs. Google asks for original, helpful content.
- Posting once and stopping. A steady rhythm matters more than speed.
- Hiding affiliate links. Say so, and keep trust.
Your launch checklist
- Topic written as one sentence
- Domain and hosting bought
- WordPress installed
- Site title, tagline and Post name links set
- Theme chosen
- At least three posts published
- About, Contact and Privacy Policy pages live
- Basic SEO habits in place
- Updates run and a backup taken
- Login username changed and login names hidden
- First shares sent
How we chose
Frequently asked questions
How do I start a blog for free?
You can try a free platform, but you will not own it and your address will carry the platform’s name. WordPress.org is free software, but hosting and a domain cost money. If you plan to grow the blog, most people pay for hosting.
How much does it cost to start a blog in India?
On 15 Nov 2026 Hostinger’s Premium plan was ₹6,672 for 48 months before GST, which is ₹7,873 with 18% GST, about ₹164 a month. It renews at ₹449 a month before GST. Prices change, so read the plan page on the day you buy.
Do I need to know coding?
No. WordPress has a block editor where you write in boxes, a bit like a document. You can launch a blog with no code.
Which platform is best for a beginner?
For a blog you want to keep and grow, WordPress.org on your own hosting is the usual choice. It is free software, you own everything, and it has thousands of themes. A website builder is quicker to start but ties you to one company.
How long does setup take?
Buying hosting and installing WordPress can be done in an afternoon. On our test site, writing and publishing a first post took a few minutes. Growing readers takes much longer.
What should my first post be about?
Answer one question a beginner in your topic would ask, in plain words. A simple how-to is a good start.
Should I change my WordPress username?
Yes, if it is admin, your real name or your site name. Those are the first guesses in login attacks, and a leaked login name saves an attacker one guess. WordPress will not let you edit a username in the profile screen, so use a plugin like SmartUsername (we make it), WP-CLI or a new administrator account. Our step 11 shows two ways with screenshots.
Do I need a domain and hosting?
Yes, for your own blog. The domain is your web address. Hosting is the computer that keeps your site online. Hostinger’s FAQ explains the same split.
Is WordPress really free?
The software is free and open source under the GPLv2 licence, as wordpress.org says. Hosting, a domain and some themes or plugins cost money.
How often should I post?
Pick a rhythm you can keep. One good post a week beats seven rushed ones followed by silence. Google does not publish a posting number.
About this page

- WordPress developer and designer, builds sites for clients
- WordCamp Asia Communication Co-Lead
- 14K+ subscribers on the DigitalPritam YouTube channel
How we checked
Updated 15 Nov 2026Sources
- Hostinger web hosting, India (hostinger.in/web-hosting), read 15 Nov 2026
- WordPress.org: About (wordpress.org/about), read 15 Nov 2026
- SmartUsername on WordPress.org (wordpress.org/plugins/smartusername), read 15 Nov 2026
- Google Search Central: SEO Starter Guide, read 15 Nov 2026
Keep reading
 What is blogging?
 Change your WordPress username
 How to do keyword research
 17 blog examples
Check the plan price on the day you buy. Plans and sales change.
 FREE PDF
Get the Hostinger setup checklist, plus every sale alert
The exact steps we use on our lab sites, and an email when each big hosting sale opens.
Sent instantly. Deal alerts until 1 Dec. Unsubscribe in one click.


 Pritam Sonone